Redis数据库
约 5686 字大约 19 分钟
1.基本概念
Redis的介绍
redis是一个开源的,内存中的数据结构存储系统,它可以用作数据库、缓存和消息中间件。它支持多种类型的数据结构,如字符串strings,散列hashes,列表lists,集合sets,有序集合sorted sets的范围查询,bitmaps,hyperloglogs 和地理空间geospatial索引半径查询。

Redis的特点
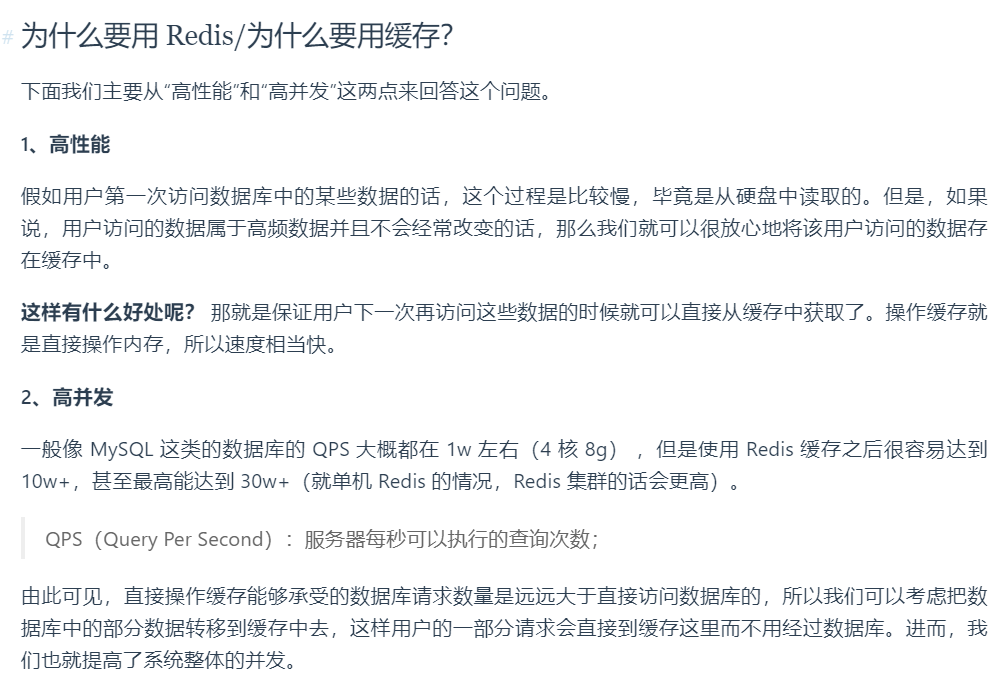
Redis以内存作为数据存储介质,所以读写数据的效率极高,远远超过数据库。
Redis支持数据的持久化,可以将内存中的数据保存在磁盘中,重启时可以再次加载使用。
Redis是单线程的,所以Redis的所有单个操作都是原子性的。减少了上下文切换,减少了线程间的切换对CPU的消耗。也减少了加锁,解锁的过程。也减少了死锁的风险。
Redis支持数据的备份(master-slave)与集群(分片存储),以及拥有哨兵监控机制。
支持事务。

Redis的场景
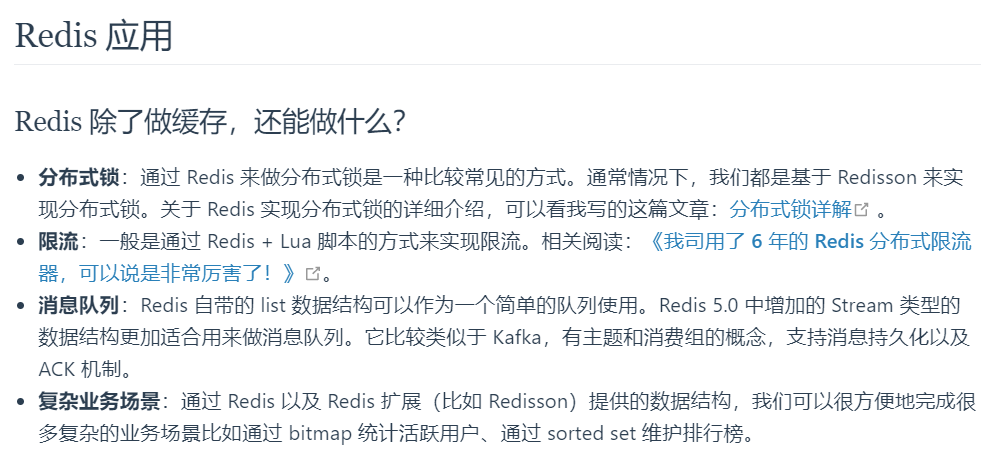
数据缓存:为热点数据加速查询(主要场景),如热点商品、热点新闻等高访问量信息等。
即时信息查询:排行榜、网站访问统计、公交到站信息、在线人数信息等。
时效性信息控制:如验证码控制、投票控制等
分布式数据共享:如分布式集群架构中的session分离

Redis的优势
性能极高,Redis能读的速度是110000次/s,写的速度是81000次/s , 并且因为数据存在内存中,所以数据获取快。单条命令式保存原子性的,但是事务不保证原子性,通过MULTI和EXEC指令包起来。
假设在某一个大型网站首页一天有100万人访问,其中有一个板块为推荐新闻。要是直接从数据库查询,那么一天就要多消耗100万次数据库请求。将这种热点数据存到Redis(内存)中,要用的时候,直接从内存取,极大的提高了速度和节约了服务器的开销。
2.Redis常用命令


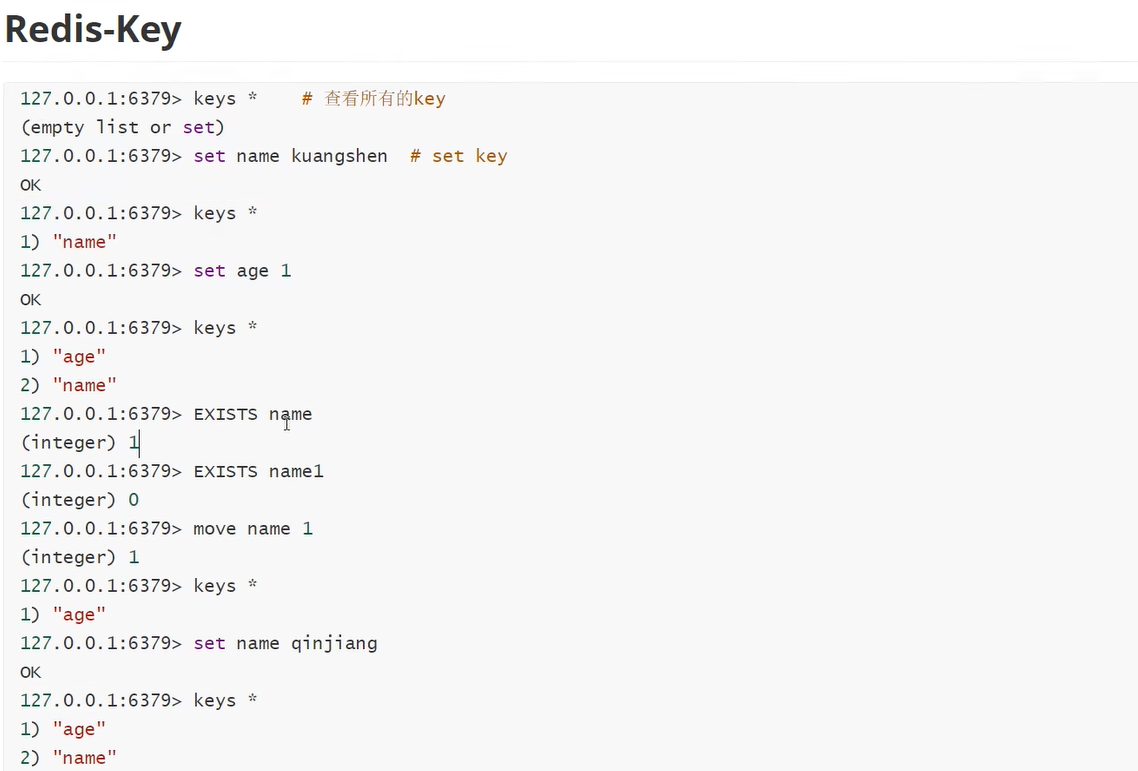
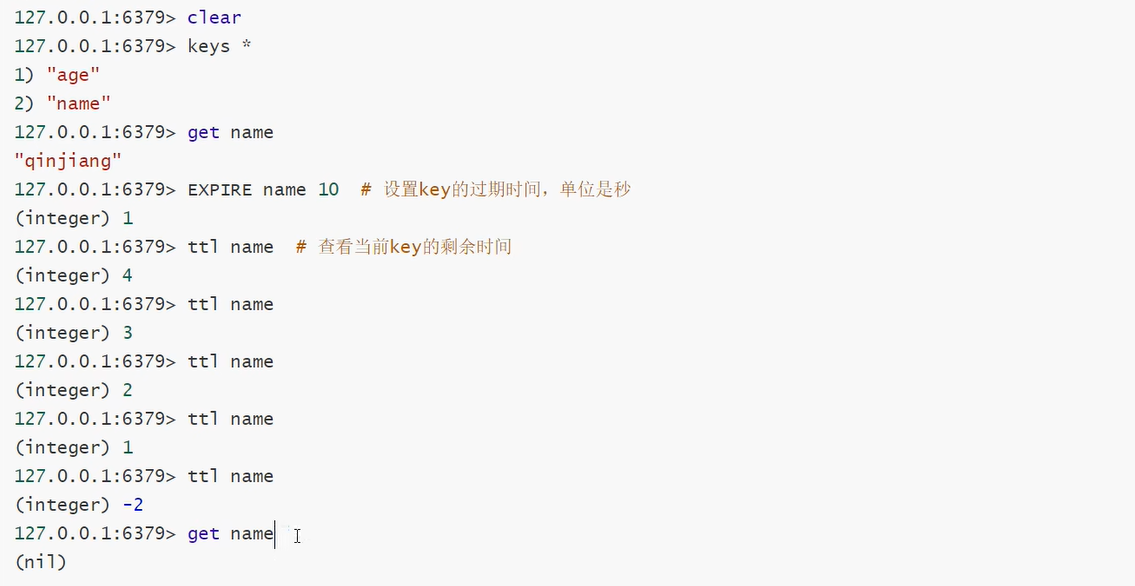
3.字符串类型string


(1)
set:设置键值对
get:取值

127.0.0.1:6379> flushdb
OK
127.0.0.1:6379> keys *
(empty list or set)
127.0.0.1:6379> set k1 v100
OK
127.0.0.1:6379> set k2 v200
OK
127.0.0.1:6379> keys *
1) "k2"
2) "k1"
127.0.0.1:6379> get k1
"v100"
127.0.0.1:6379> get k2
"v200"
127.0.0.1:6379> set k1 v1000
OK
127.0.0.1:6379> get k1
"v1000"

(2)
append < key> < value>:将给定的< value >追加到原值的末尾。

127.0.0.1:6379> append k1 abc
(integer) 8
127.0.0.1:6379> get k1
"v1000abc"

(3)
strlen < key >:获得值得长度

127.0.0.1:6379> strlen k1
(integer) 8

(4)
setnx < key >< value >只在key不存在时,设置key的值。

127.0.0.1:6379> setnx k1 v1
(integer) 0
127.0.0.1:6379> setnx k3 v300
(integer) 1

(5)
incr < key > : 将key中存储的数字值增1。只能对数字值操作,如果为空,新增值为1
decr < key > :将key中存储的数字值减1。只能对数字值操作,如果为空,新增值为-1

127.0.0.1:6379> set k4 1
OK
127.0.0.1:6379> incr k4
(integer) 2
127.0.0.1:6379> get k4
"2"
127.0.0.1:6379> decr k4
(integer) 1
127.0.0.1:6379> get k4
"1"

(6)
incrby / decrby < key > < 步长 > 将key中存储的数字值增减。自定义步长。

127.0.0.1:6379> set k4 5
OK
127.0.0.1:6379> get k4
"5"
127.0.0.1:6379> incrby k4 10
(integer) 15
127.0.0.1:6379> decrby k4 10
(integer) 5

(7)
mset < key1 > < value1> < key2 > < value2>…
同时设置一个或多个key-value对。
mget < key1> < key2 > < key3 >…

注意:
这个操作是要保持原子性的。所谓原操作,是指不会被线程调度机制打断的操作;
这种操作一旦开始,就一直运行到结束,中间不会切换到另一个线程。
在单线程中,能够在单条指令中完成的操作都可以认为是“原子操作”。
在多线程中,不能被其他进程(线程)打断的操作就叫原子操作。
Redis单命令的原子性主要得益于Redis的单线程。

127.0.0.1:6379> flushdb
OK
127.0.0.1:6379> keys *
(empty list or set)
127.0.0.1:6379> mset k1 v1 k2 v2
OK
127.0.0.1:6379> keys *
1) "k2"
2) "k1"
127.0.0.1:6379> mget k1 k2
1) "v1"
2) "v2"

(8)
msetnx < key1> < value1> < key2> < value2>…
同时设置一个或多个key-value对,当且仅当所有给定key都不存在。
且也具有原子性,有一个失败则都失败。

127.0.0.1:6379> msetnx k11 v11 k1 v1
(integer) 0
127.0.0.1:6379> keys *
1) "k2"
2) "k1"
127.0.0.1:6379> msetnx k11 v11 k22 v22
(integer) 1
127.0.0.1:6379> keys *
1) "k2"
2) "k11"
3) "k22"
4) "k1"

(9)
getrange < key> < 开始位置 > < 结束位置 >
获取值的范围,相当于 substr()。

127.0.0.1:6379> set name abcde
OK
127.0.0.1:6379> getrange name 0 3
"abcd"

(10)
setrange < key > < 起始位置> < value >
用 < value >覆写 < key >所存储的字符串值,从< 起始位置 > 开始(索引从0开始)。

127.0.0.1:6379> setrange name 0 xyz
(integer) 5
127.0.0.1:6379> get name
"xyzde"

(11)
getset < key > < value >
以新换旧,设置了新值同时获得旧值。

127.0.0.1:6379> get k1
"v1"
127.0.0.1:6379> getset k1 v11
"v1"
127.0.0.1:6379> get k1
"v11"

(12)
setex < key > < 过期时间> < value >
设置键值的同时,设置过期时间,单位秒。
设置一个key-value后,ttl查看过期时间,-2表示已过期。

127.0.0.1:6379> setex k5 10 100
OK
127.0.0.1:6379> ttl k5
(integer) 7
127.0.0.1:6379> ttl k5
(integer) 3
127.0.0.1:6379> ttl k5
(integer) -2
4.列表类型list


(1)
lpush/rpush < key > < value1 > < value2 >…
从左边/右边插入一个或多个值
lrange < key > < start > < stop >
按照索引下标获得元素(从左到右),若stop为-1,表示取所有值

127.0.0.1:6379> flushdb
OK
127.0.0.1:6379> keys *
(empty list or set)
127.0.0.1:6379> lpush k1 v1 v2 v3
(integer) 3
127.0.0.1:6379> lrange k1 0 -1
1) "v3"
2) "v2"
3) "v1"
127.0.0.1:6379> rpush k2 v1 v2 v3
(integer) 3
127.0.0.1:6379> lrange k2 0 -1
1) "v1"
2) "v2"
3) "v3"

(2)
lpop/rpop < key > 从左边、右边吐出一个值。
值在键在,值光键亡

127.0.0.1:6379> lpop k2
"v1"
127.0.0.1:6379> lpop k2
"v2"
127.0.0.1:6379> lpop k2
"v3"
127.0.0.1:6379> lpop k2
(nil)
127.0.0.1:6379> rpop k1
"v1"
127.0.0.1:6379> rpop k1
"v2"
127.0.0.1:6379> rpop k1
"v3"
127.0.0.1:6379> rpop k1
(nil)

(3)
rpoplpush < key1> < key2>
从< key1>列表右边吐出一个值,插入到 < key2>列表左边

127.0.0.1:6379> keys *
(empty list or set)
127.0.0.1:6379> lpush k1 v1 v2 v3
(integer) 3
127.0.0.1:6379> rpush k2 v11 v22 v33
(integer) 3
127.0.0.1:6379> rpoplpush k1 k2
"v1"
127.0.0.1:6379> lrange k2 0 -1
1) "v1"
2) "v11"
3) "v22"
4) "v33"

(4)
lindex < key> < index> 按照索引下标获得元素(从左到右)
127.0.0.1:6379> lindex k2 0
"v1"
127.0.0.1:6379> lindex k2 1
"v11"
127.0.0.1:6379> lindex k2 2
"v22"

(5)
llen < key> 获取列表长度
127.0.0.1:6379> llen k1
(integer) 2
127.0.0.1:6379> llen k2
(integer) 4

(6)
linsert < key> before < value > < newvalue> 在 < value > 的后面插入newvalue
127.0.0.1:6379> llen k2
(integer) 4
127.0.0.1:6379> lrange k2 0 -1
1) "v1"
2) "v11"
3) "v22"
4) "v33"
127.0.0.1:6379> linsert k2 before v11 newv11
(integer) 5
127.0.0.1:6379> linsert k2 before v22 newv22
(integer) 6
127.0.0.1:6379> lrange k2 0 -1
1) "v1"
2) "newv11"
3) "v11"
4) "newv22"
5) "v22"
6) "v33"

(7)
lrem < key> < n > < value >
从左边删除n个value(从左到右)

127.0.0.1:6379> lrange k2 0 -1
1) "v1"
2) "newv11"
3) "newv11"
4) "v11"
5) "newv22"
6) "v22"
7) "v33"
127.0.0.1:6379> lrem k2 2 newv11
(integer) 2
127.0.0.1:6379> lrange k2 0 -1
1) "v1"
2) "v11"
3) "newv22"
4) "v22"
5) "v33"
127.0.0.1:6379>

(8)
lset < key> < index > < value >
将列表key下标为index的值替换为value

127.0.0.1:6379> lset k2 0 first
OK
127.0.0.1:6379> lrange k2 0 -1
1) "first"
2) "v11"
3) "newv22"
4) "v22"
5) "v33"
5.集合类型set


(1)
sadd < key> < value1> < value2>…
将一个或多个member元素加入到集合key中,已经存在的member元素将被忽略。
smembers < key>
取出该集合的所有值

127.0.0.1:6379> sadd k1 v1 v2 v3
(integer) 3
127.0.0.1:6379> smembers k1
1) "v3"
2) "v2"
3) "v1"

(2)
sismember < key> < value>
判断集合< key> 是否为含有该 < value>值,有返回1,没有返回0。

127.0.0.1:6379> sismember k1 v1
(integer) 1
127.0.0.1:6379> sismember k1 v2
(integer) 1
127.0.0.1:6379> sismember k1 v4
(integer) 0

(3)
scard < key>
查询 < key>的元素个数

127.0.0.1:6379> scard k1
(integer) 3

(4)
srem < key> < value1> < value2>…
删除集合中的某个元素

127.0.0.1:6379> smembers k1
1) "v3"
2) "v2"
3) "v1"
127.0.0.1:6379> srem k1 v2
(integer) 1
127.0.0.1:6379> smembers k1
1) "v3"
2) "v1"

(5)
spop < key >
随机从该集合中吐出一个值。

127.0.0.1:6379> smembers k1
1) "v3"
2) "v1"
127.0.0.1:6379> spop k1
"v3"
127.0.0.1:6379> spop k1
"v1"
127.0.0.1:6379> spop k1
(nil)

(6)
srandmember < key> < n>
随机从该集合中取出n个值,不会从集合中删除元素

127.0.0.1:6379> sadd k1 v1 v2 v3 v4 v5
(integer) 5
127.0.0.1:6379> smembers k1
1) "v4"
2) "v3"
3) "v2"
4) "v1"
5) "v5"
127.0.0.1:6379> srandmember k1 2
1) "v1"
2) "v2"
127.0.0.1:6379> srandmember k1 3
1) "v3"
2) "v1"
3) "v4"

(7)
smove < source> < destination> value
把集合中一个值从一个集合移动到另一个集合

127.0.0.1:6379> sadd k1 v1 v2 v3
(integer) 3
127.0.0.1:6379> sadd k2 v3 v4 v5
(integer) 3
127.0.0.1:6379> smove k1 k2 v3
(integer) 1
127.0.0.1:6379> smembers k1
1) "v2"
2) "v1"
127.0.0.1:6379> smembers k2
1) "v4"
2) "v3"
3) "v5"

(8)
sinter < key1> < key2>
返回两个集合的交集元素

127.0.0.1:6379> sadd k1 v1 v2 v3
(integer) 3
127.0.0.1:6379> sadd k2 v2 v3 v4
(integer) 3
127.0.0.1:6379> sinter k1 k2
1) "v3"
2) "v2"

(9)
sunion < key1> < key2>
返回两个集合的并集元素

127.0.0.1:6379> sunion k1 k2
1) "v2"
2) "v3"
3) "v1"
4) "v4"

(10)
sdiff < key1> < key2>
返回两个集合的差集元素(k1中的,不包含k2中的)

127.0.0.1:6379> sdiff k1 k2
1) "v1"
6.散列类型hash


(1)
hset < key> < field> < value>
给< key>集合中的 < field>键赋值< value>
hget < key1> < field>
从 < key1>集合 < field>取出 value

127.0.0.1:6379> hset user:1001 id 1
(integer) 1
127.0.0.1:6379> hset user:1001 name jack
(integer) 1
127.0.0.1:6379> hset user:1001 name
(error) ERR wrong number of arguments for 'hset' command
127.0.0.1:6379> hget user:1001 name
"jack"
127.0.0.1:6379> hget user:1001 id
"1"

(2)
hmset < key1> < field1> < value1>< field2>< value2>…
批量设置hash的值。

127.0.0.1:6379> hmset user:1002 id 2 name sam age 30
OK
127.0.0.1:6379> hmset user:1003 id 3 name amy
OK

(3)
hexists < key1> < field>
查看哈希表key种,给定域field是否存在

127.0.0.1:6379> hexists user:1001 name
(integer) 1
127.0.0.1:6379> hexists user:1002 name
(integer) 1
127.0.0.1:6379> hexists user:1001 age
(integer) 0

(4)
hkeys < key>
列出该hash集合的所有field

127.0.0.1:6379> hkeys user:1001
1) "id"
2) "name"
127.0.0.1:6379> hkeys user:1002
1) "id"
2) "name"
3) "age"

(5)
hvals < key>
列出该hash集合的所有value

127.0.0.1:6379> hvals user:1001
1) "1"
2) "jack"
127.0.0.1:6379> hvals user:1002
1) "2"
2) "sam"
3) "30"

(6)
hincrby < key> < field> < increment>
为哈希表key中的域field的值加上增量(1, -1)

127.0.0.1:6379> hincrby user:1002 age 2
(integer) 32
127.0.0.1:6379> hvals user:1002
1) "2"
2) "sam"
3) "32"

(7)
hsetnx < key> < field>< value>
将哈希表key中的域field的值设置为value,当且仅当field不存在

127.0.0.1:6379> hsetnx user:1002 gender 1
(integer) 1
127.0.0.1:6379> hkeys user:1002
1) "id"
2) "name"
3) "age"
4) "gender"
7.有序集合类型zset

(1)
zadd < key> < score1> < value1> < score2>< value2>…
将一个或多个member元素及其score值加入到有序集key当中。
zrange < key>< start>< stop> [WITHSCORES]
返回有序集key中,下标在< start>< stop>之间的元素。
带WITHSCORES,可以让分数一起和值返回到结果集。

127.0.0.1:6379> zadd topn 100 java 200 mysql 300 ssm
(integer) 3
127.0.0.1:6379> zrange topn 0 -1
1) "java"
2) "mysql"
3) "ssm"
127.0.0.1:6379> zrange topn 0 -1 withscores
1) "java"
2) "100"
3) "mysql"
4) "200"
5) "ssm"
6) "300"

(2)
zrangebyscore key minmax [withscores] [limit offset count]
返回有序集key中,所有score值介于min和max之间(包括等于min或max)的成员。
有序集成员按score值递增(从小到大)次序排列。

127.0.0.1:6379> zrangebyscore topn 100 300
1) "java"
2) "mysql"
3) "ssm"
127.0.0.1:6379> zrangebyscore topn 100 200 withscores
1) "java"
2) "100"
3) "mysql"
4) "200"

(3)
zrevrangebyscore key minmax [withscores] [limit offset count]
同上,改为从大到小排列。

127.0.0.1:6379> zrevrange topn 0 -1 withscores
1) "ssm"
2) "300"
3) "mysql"
4) "200"
5) "java"
6) "100"
127.0.0.1:6379>
127.0.0.1:6379> zrevrangebyscore topn 300 200 withscores
1) "ssm"
2) "300"
3) "mysql"
4) "200"

(4)
zincrby < key>< increment>< member>
为成员的score加上增量

127.0.0.1:6379> zincrby topn 50 cpp
"50"
127.0.0.1:6379> zrange topn 0 -1 withscores
1) "cpp"
2) "50"
3) "java"
4) "100"
5) "mysql"
6) "200"
7) "ssm"
8) "300"
127.0.0.1:6379> zincrby topn 50 java
"150"
127.0.0.1:6379> zrange topn 0 -1 withscores
1) "cpp"
2) "50"
3) "java"
4) "150"
5) "mysql"
6) "200"
7) "ssm"
8) "300"

(5)
zrem < key>< value>
删除该集合下,指定值的元素。

127.0.0.1:6379> zrem topn java
(integer) 1
127.0.0.1:6379> zrange topn 0 -1
1) "cpp"
2) "mysql"
3) "ssm"

(6)
zcount < key>< min> < max>
统计该集合,分数区间内元素个数

127.0.0.1:6379> zrange topn 0 -1 withscores
1) "cpp"
2) "50"
3) "mysql"
4) "200"
5) "ssm"
6) "300"
127.0.0.1:6379> zcount topn 50 300
(integer) 3

(7)
zrank < key>< value>
返回该值在集合中的排名,从0开始

127.0.0.1:6379> zrank topn mysql
(integer) 1
127.0.0.1:6379> zrank topn cpp
(integer) 0
8.geospatial类型


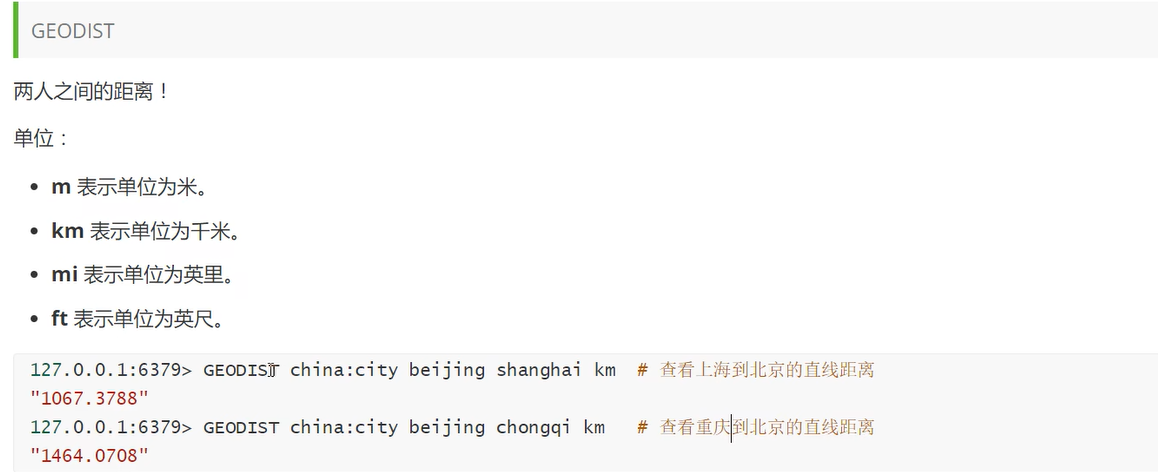
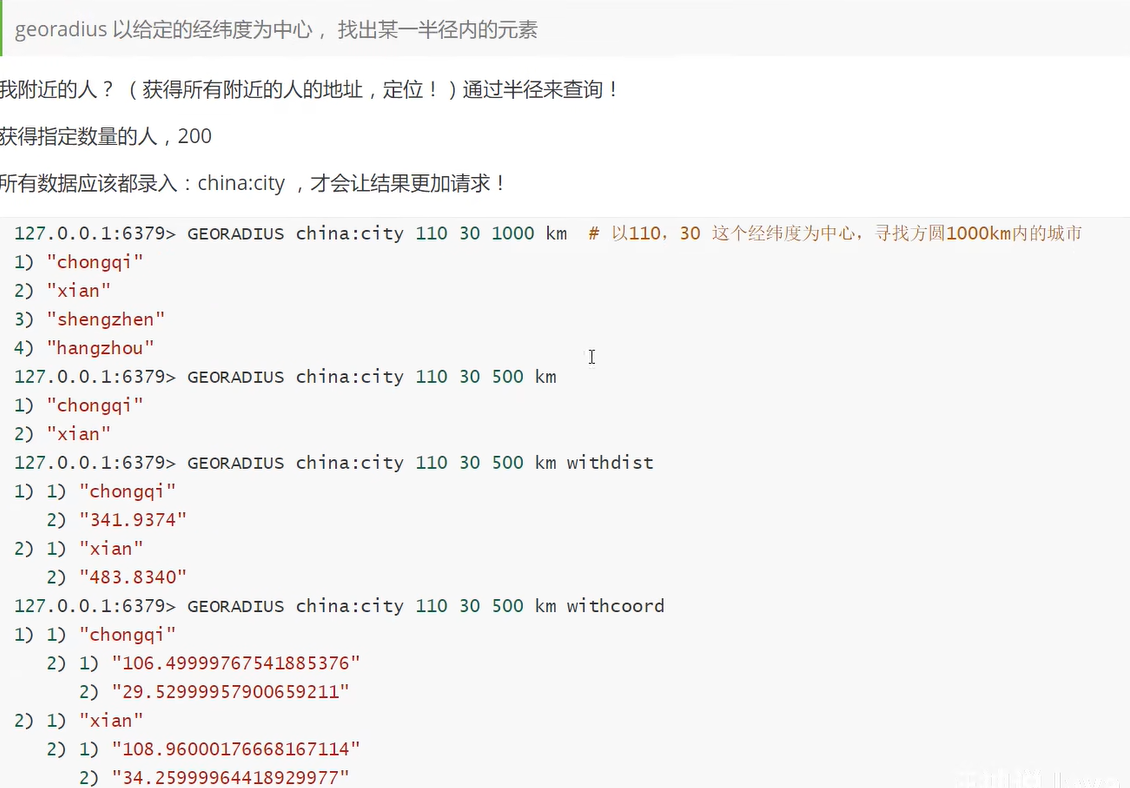
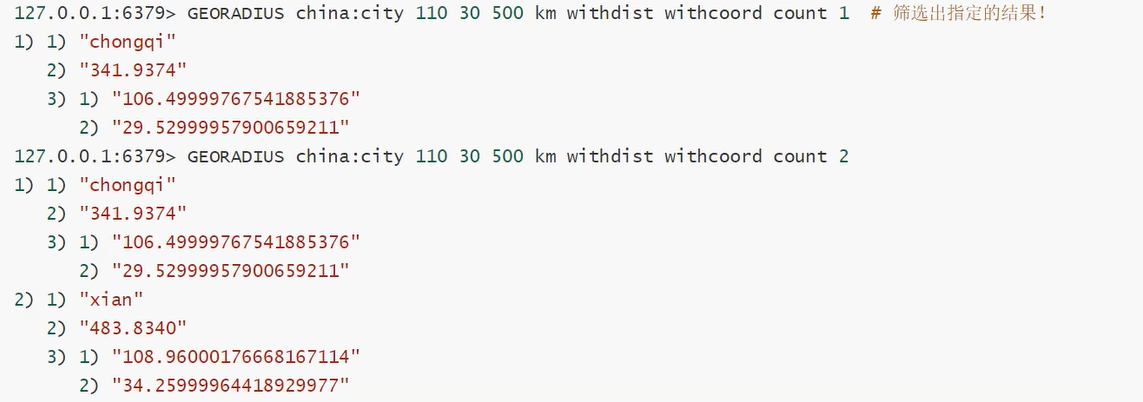


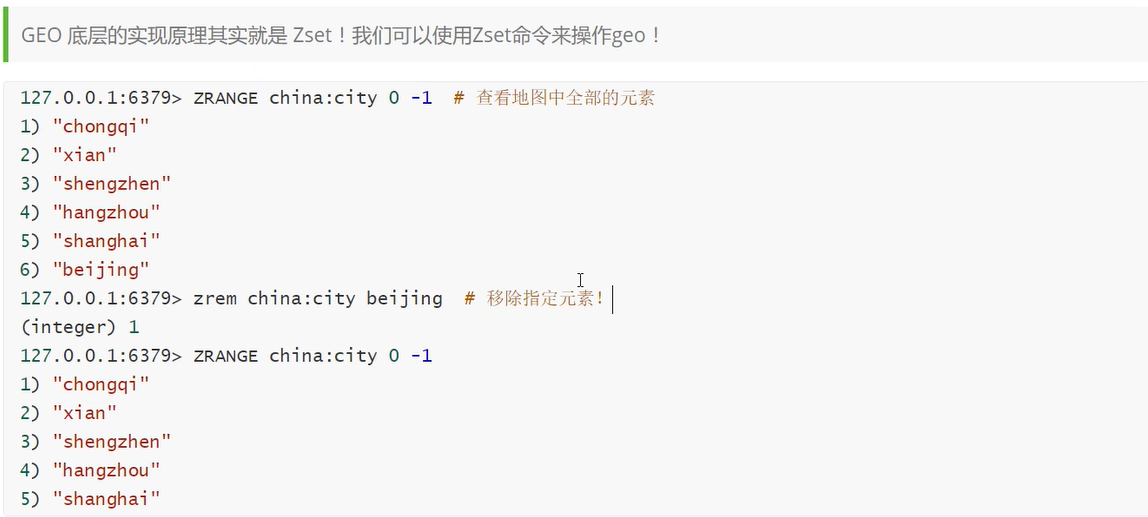
9.hyperloglog类型
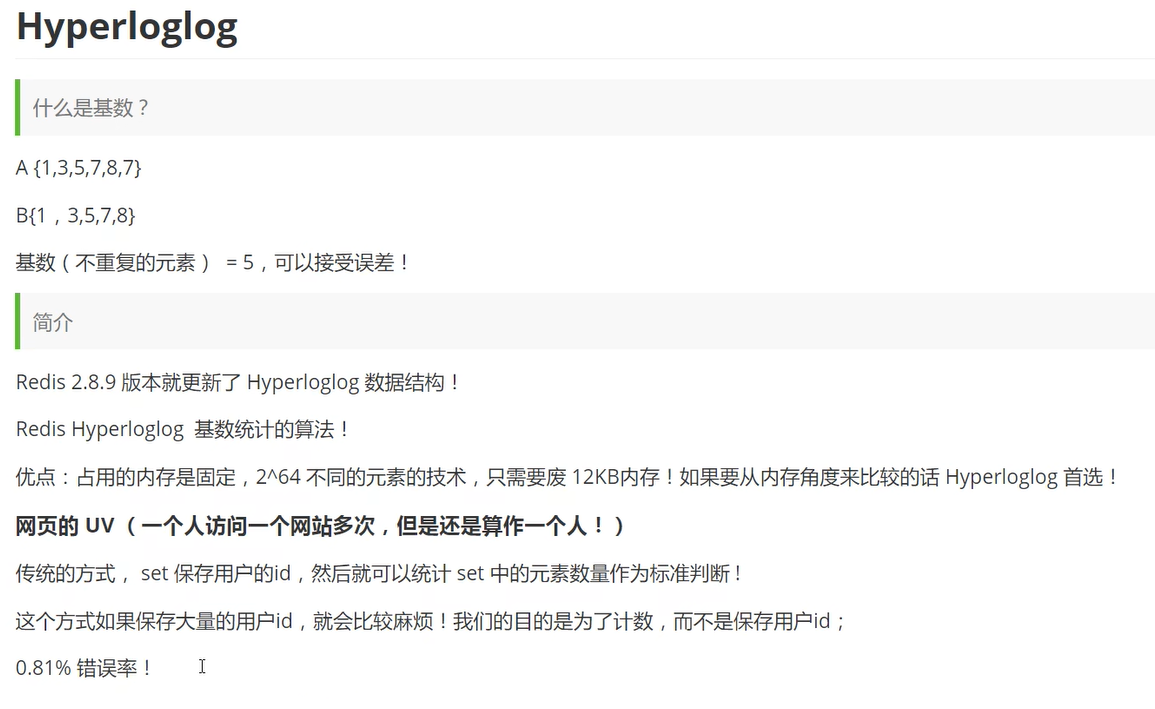
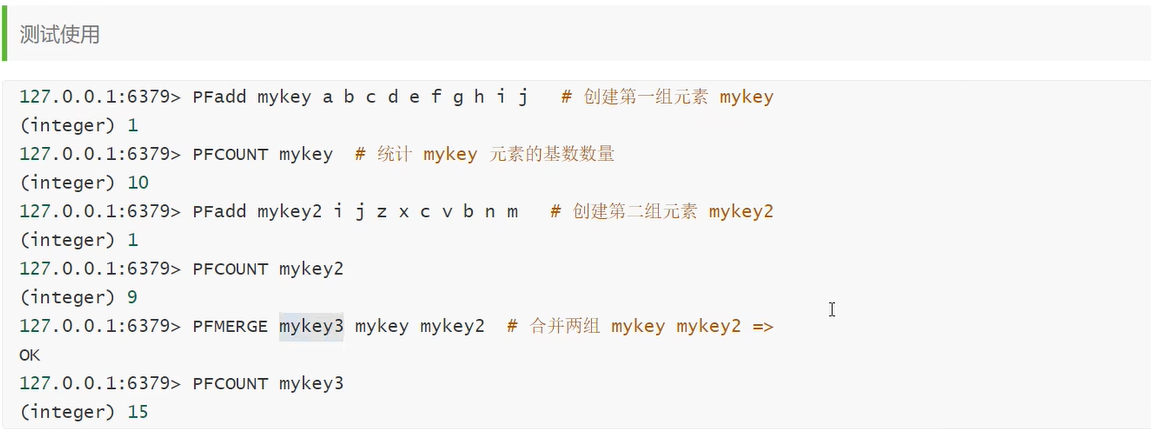
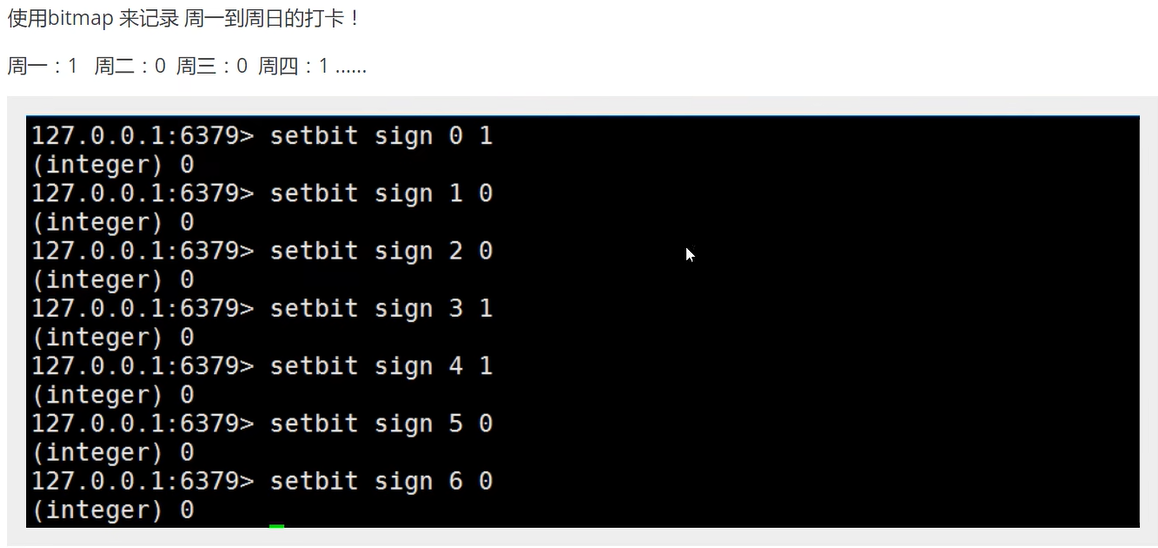
10.bitmap类型


11.事务

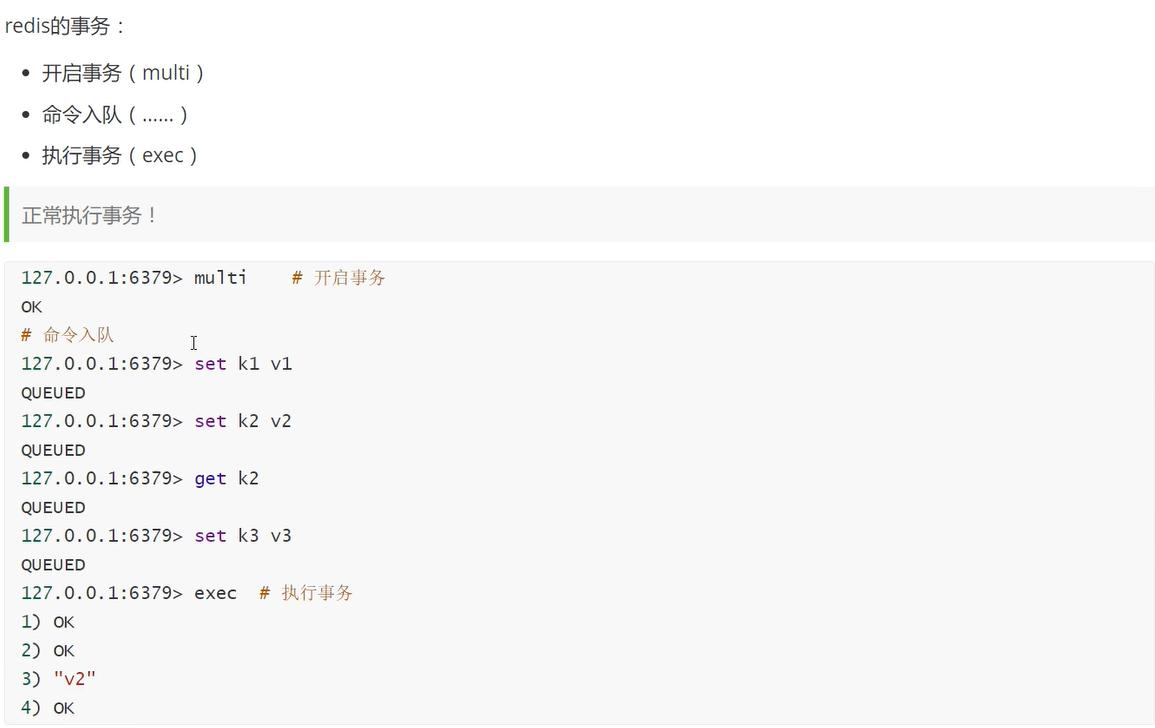
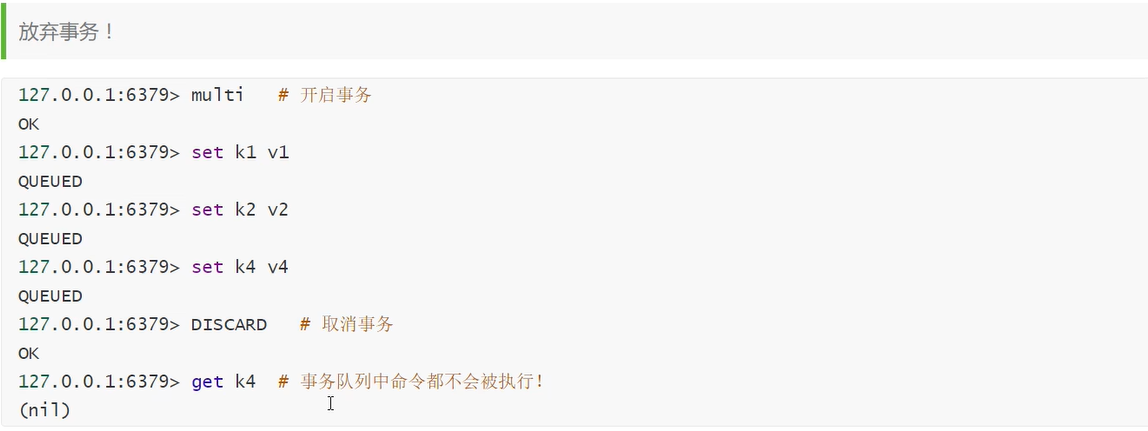
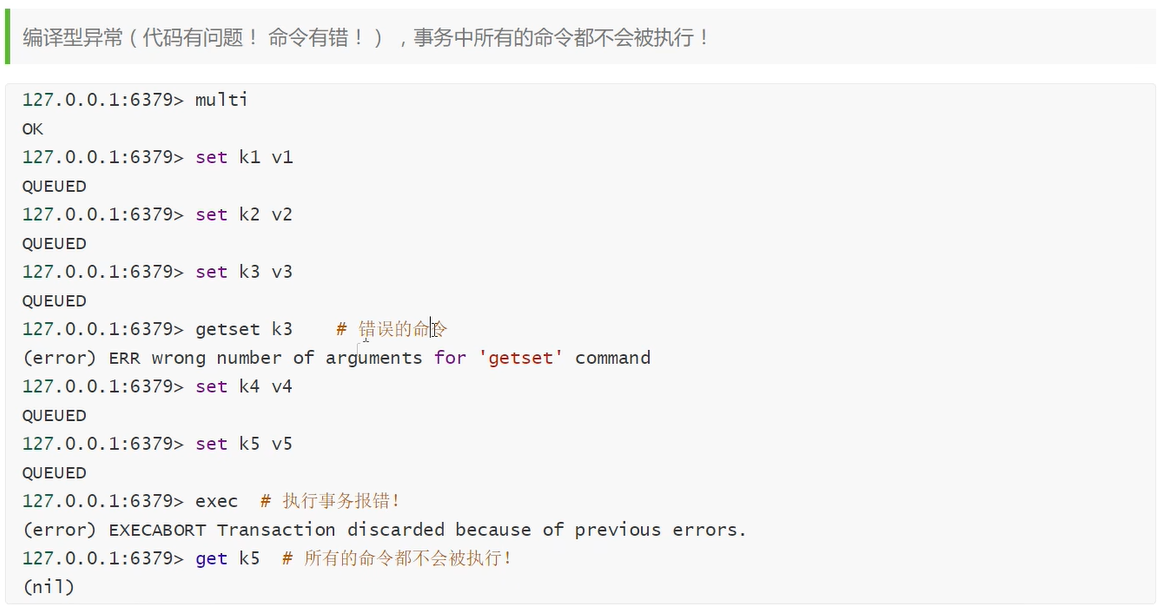
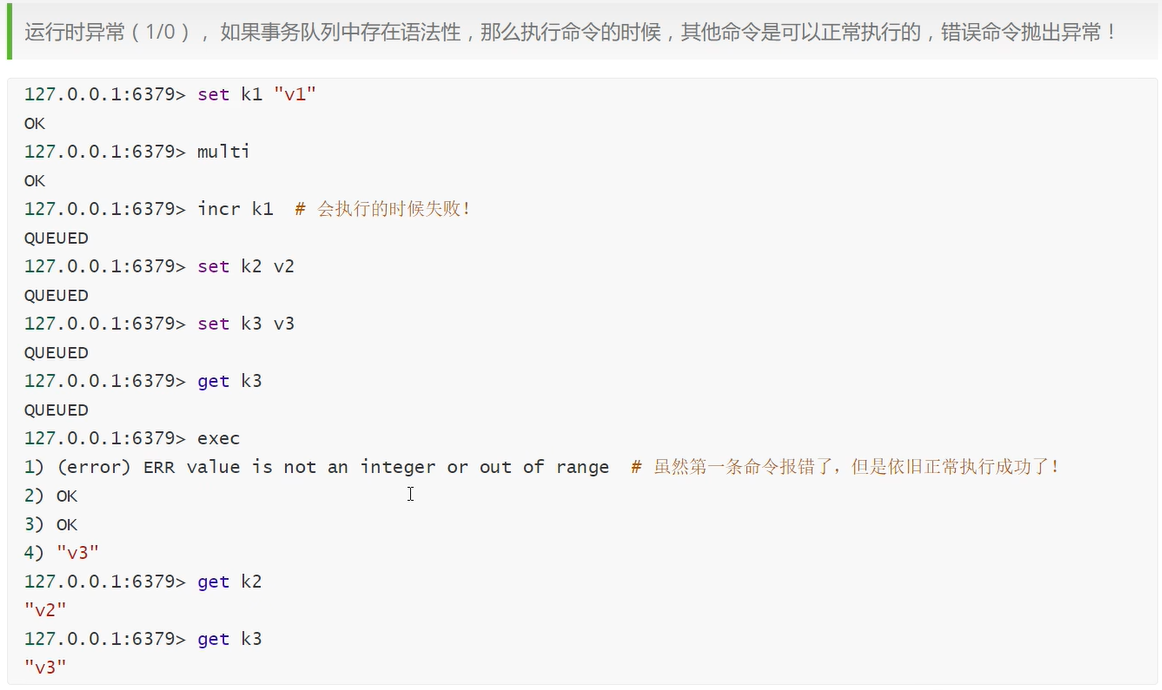
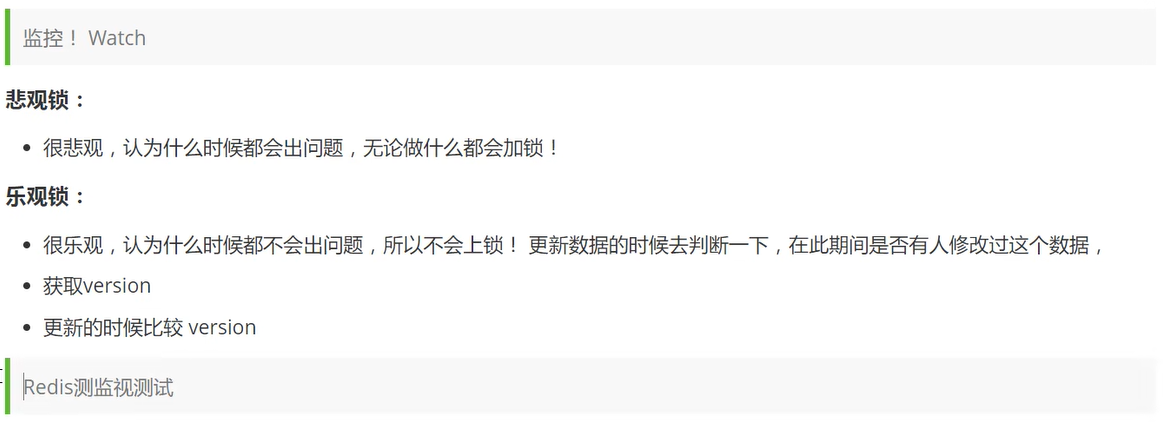
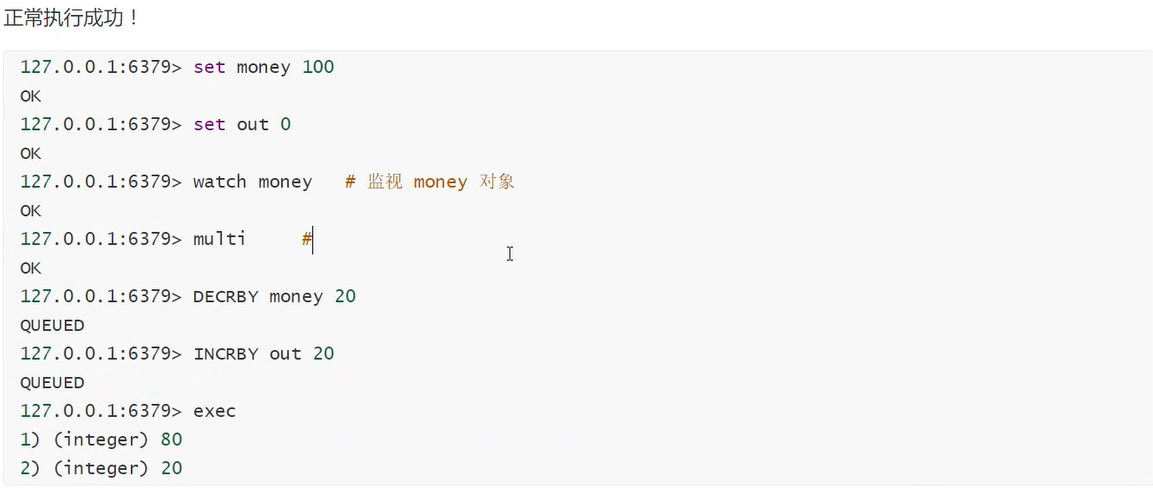

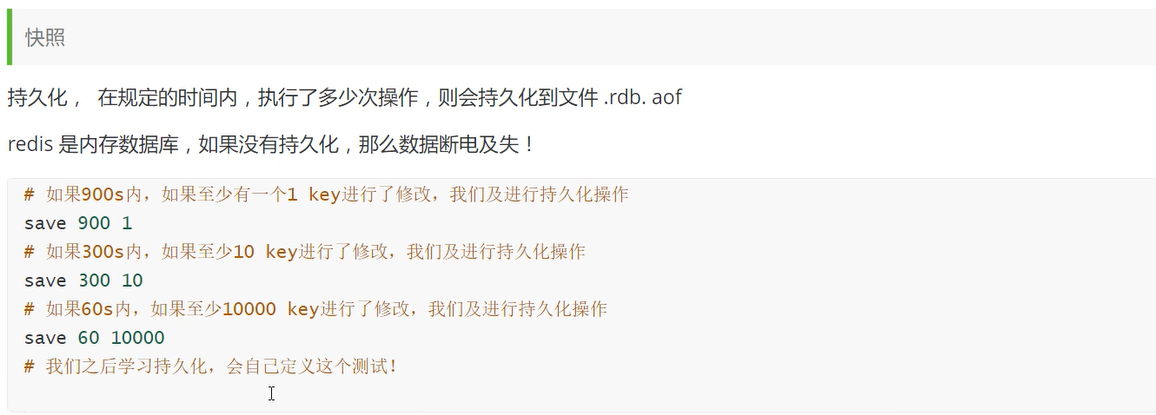
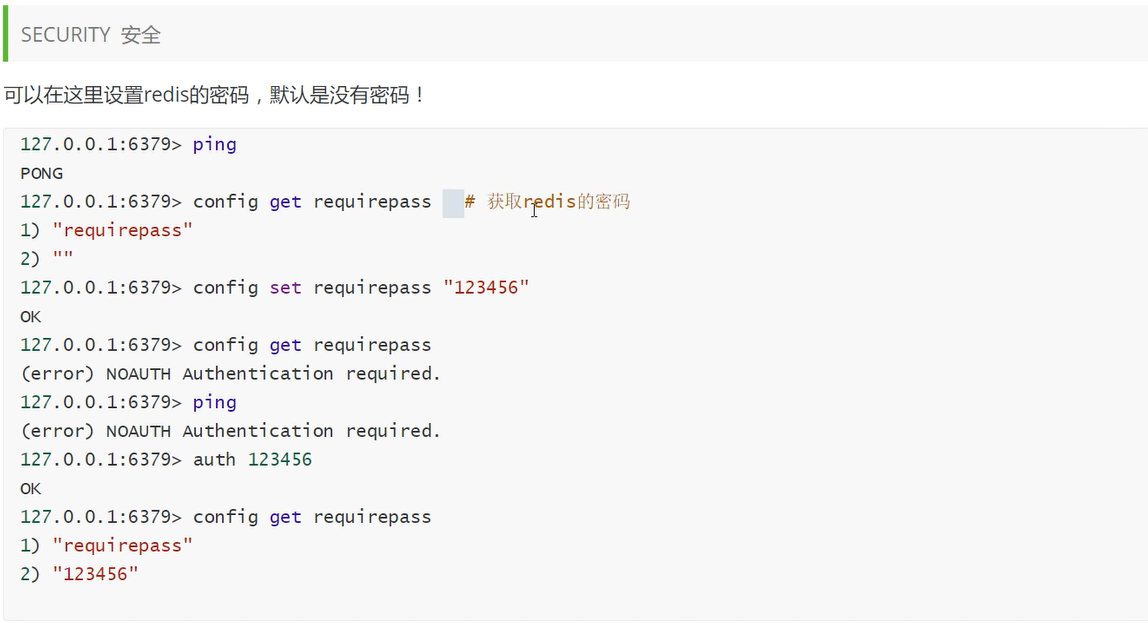
12.Redis配置文件

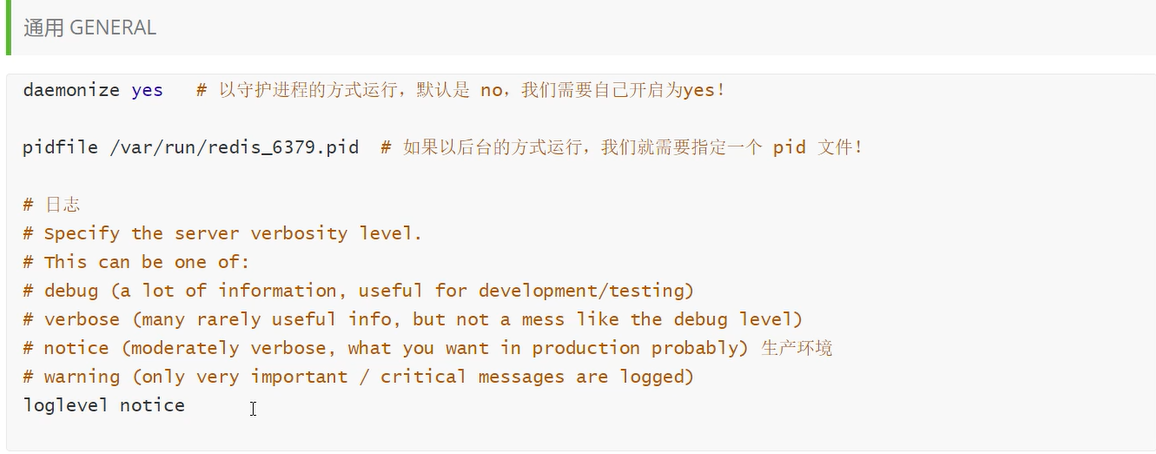




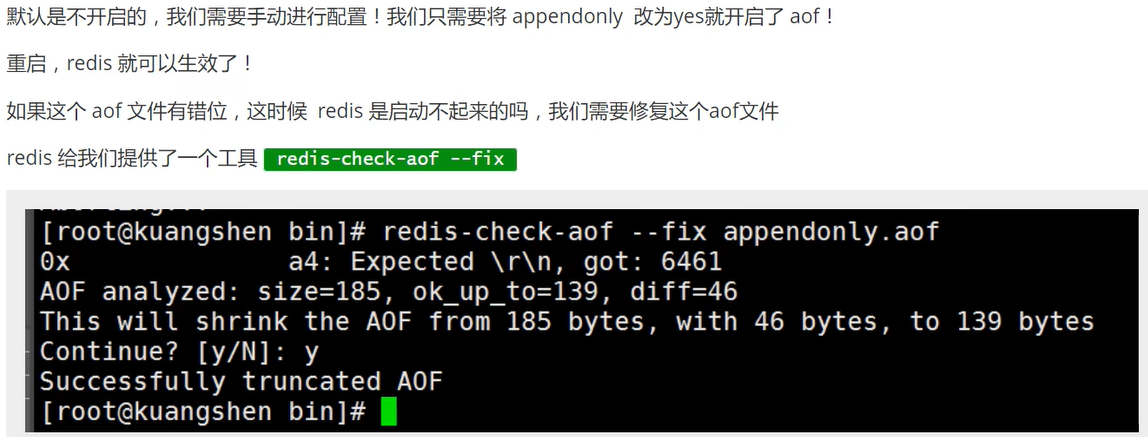
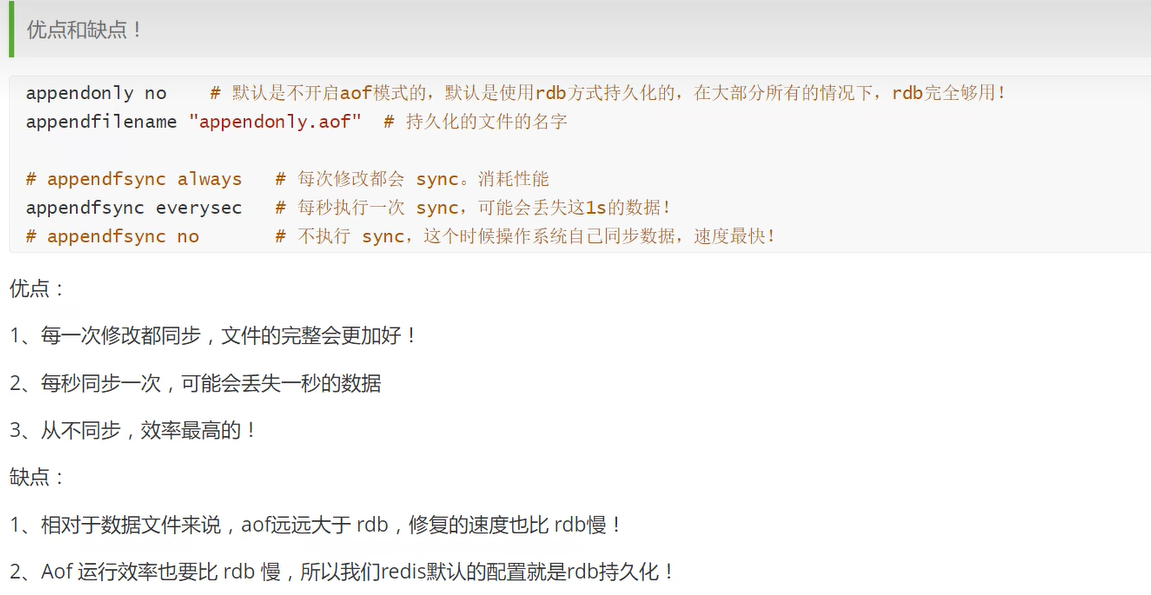
13.RDB和AOF



14.SpringBoot整合Redis
配置
pom.xml

    <dependencies>

        <!-- (1)开启 cache 缓存 -->
        <dependency>
            <groupId>org.springframework.boot</groupId>
            <artifactId>spring-boot-starter-cache</artifactId>
        </dependency>

        <!-- (2)ehcache 缓存、Redis是一级缓存、ehcache是二级缓存 -->
        <dependency>
            <groupId>net.sf.ehcache</groupId>
            <artifactId>ehcache</artifactId>
        </dependency>

        <!-- (3)redis -->
        <dependency>
            <groupId>org.springframework.boot</groupId>
            <artifactId>spring-boot-starter-data-redis</artifactId>
        </dependency>

        <!-- (4)Springboot2.x以后默认情况下使用lettuce框架访问Redis,所以需要在pom.xml文件添加commons-pool2 -->
        <dependency>
            <groupId>org.apache.commons</groupId>
            <artifactId>commons-pool2</artifactId>
        </dependency>

        <!-- (5)使用Guava在内存中维护一个布隆过滤器 -->
        <dependency>
            <groupId>com.google.guava</groupId>
            <artifactId>guava</artifactId>
            <version>29.0-jre</version>
        </dependency>

        <!-- (6)使用Guava在内存中维护一个布隆过滤器 -->
        <dependency>
            <groupId>mysql</groupId>
            <artifactId>mysql-connector-java</artifactId>
            <scope>runtime</scope>
        </dependency>

        <!-- MP -->
        <dependency>
            <groupId>com.baomidou</groupId>
            <artifactId>mybatis-plus-boot-starter</artifactId>
            <version>3.5.1</version>
        </dependency>

        <!-- spring web -->
        <dependency>
            <groupId>org.springframework.boot</groupId>
            <artifactId>spring-boot-starter-web</artifactId>
        </dependency>

        <!-- lombok -->
        <dependency>
            <groupId>org.projectlombok</groupId>
            <artifactId>lombok</artifactId>
            <optional>true</optional>
        </dependency>

        <!-- junit -->
        <dependency>
            <groupId>org.springframework.boot</groupId>
            <artifactId>spring-boot-starter-test</artifactId>
            <scope>test</scope>
        </dependency>

</dependencies>


application.yml

spring:
  cache:
    ehcache:
      config: classpath:ehcache.xml
    type: ehcache
  application:
    name: redis_demo
  ##redis数据库配置
  redis:
    database: 0 ## Redis数据库索引(默认为0)
    host: 127.0.0.1 ## Redis服务器地址
    ##password: 123456 ## Redis密码(默认没有)
    port: 6379 ## Redis服务器端口
    lettuce:
      pool:
        maxActive: 8 ##最大连接数
        maxIdle: 8  ##最大空闲连接数
        minIdle: 0 ##最小空闲连接数
        maxWait: -1 ##阻塞等待时间(负数表示没有等待)
    timeout: 2000 ##超时时间
  datasource:
    password: root
    username: root
    driver-class-name: com.mysql.cj.jdbc.Driver
    url: jdbc:mysql://127.0.0.1:3306/db01?characterEncoding=utf-8&serverTimezone=Asia/Shanghai&autoReconnect=true&useSSL=false&allowPublicKeyRetrieval=true

mybatis-plus:
  mapper-locations: classpath:mapper/*.xml
  configuration:
    ## 日志
log-impl: org.apache.ibatis.logging.stdout.StdOutImpl


配置类一:通过RedisTemplate工具类实现缓存数据库。

package com.zhaoyang.config;

import com.fasterxml.jackson.annotation.JsonAutoDetect;
import com.fasterxml.jackson.annotation.PropertyAccessor;
import com.fasterxml.jackson.databind.ObjectMapper;
import org.springframework.cache.annotation.CachingConfigurerSupport;
import org.springframework.cache.annotation.EnableCaching;
import org.springframework.context.annotation.Bean;
import org.springframework.context.annotation.Configuration;
import org.springframework.data.redis.connection.RedisConnectionFactory;
import org.springframework.data.redis.core.*;
import org.springframework.data.redis.serializer.Jackson2JsonRedisSerializer;
import org.springframework.data.redis.serializer.StringRedisSerializer;

@Configuration
@EnableCaching
public class RedisConfig extends CachingConfigurerSupport {

    /**
     * retemplate相关配置
     *
     * @param factory
     * @return
     */
    @Bean
    public RedisTemplate<String, Object> redisTemplate(RedisConnectionFactory factory) {

        RedisTemplate<String, Object> template = new RedisTemplate<>();
        // 配置连接工厂
        template.setConnectionFactory(factory);

        //使用Jackson2JsonRedisSerializer来序列化和反序列化redis的value值(默认使用JDK的序列化方式)
        Jackson2JsonRedisSerializer jacksonSeial = new Jackson2JsonRedisSerializer(Object.class);

        ObjectMapper om = new ObjectMapper();
        // 指定要序列化的域,field,get和set,以及修饰符范围,ANY是都有包括private和public
        om.setVisibility(PropertyAccessor.ALL, JsonAutoDetect.Visibility.ANY);
        // 指定序列化输入的类型,类必须是非final修饰的,final修饰的类,比如String,Integer等会跑出异常
        om.enableDefaultTyping(ObjectMapper.DefaultTyping.NON_FINAL);
        jacksonSeial.setObjectMapper(om);

        // 值采用json序列化
        template.setValueSerializer(jacksonSeial);
        //使用StringRedisSerializer来序列化和反序列化redis的key值
        template.setKeySerializer(new StringRedisSerializer());

        // 设置hash key 和value序列化模式
        template.setHashKeySerializer(new StringRedisSerializer());
        template.setHashValueSerializer(jacksonSeial);
        template.afterPropertiesSet();

        return template;
    }


    /**
     * 对hash类型的数据操作
     *
     * @param redisTemplate
     * @return
     */
    @Bean
    public HashOperations<String, String, Object> hashOperations(RedisTemplate<String, Object> redisTemplate) {
        return redisTemplate.opsForHash();
    }

    /**
     * 对redis字符串类型数据操作
     *
     * @param redisTemplate
     * @return
     */
    @Bean
    public ValueOperations<String, Object> valueOperations(RedisTemplate<String, Object> redisTemplate) {
        return redisTemplate.opsForValue();
    }

    /**
     * 对链表类型的数据操作
     *
     * @param redisTemplate
     * @return
     */
    @Bean
    public ListOperations<String, Object> listOperations(RedisTemplate<String, Object> redisTemplate) {
        return redisTemplate.opsForList();
    }

    /**
     * 对无序集合类型的数据操作
     *
     * @param redisTemplate
     * @return
     */
    @Bean
    public SetOperations<String, Object> setOperations(RedisTemplate<String, Object> redisTemplate) {
        return redisTemplate.opsForSet();
    }

    /**
     * 对有序集合类型的数据操作
     *
     * @param redisTemplate
     * @return
     */
    @Bean
    public ZSetOperations<String, Object> zSetOperations(RedisTemplate<String, Object> redisTemplate) {
        return redisTemplate.opsForZSet();
    }

}


配置类二:通过缓存注解实现缓存数据库。


package com.zhaoyang.config;

import com.fasterxml.jackson.annotation.JsonAutoDetect;
import com.fasterxml.jackson.annotation.PropertyAccessor;
import com.fasterxml.jackson.databind.ObjectMapper;
import org.springframework.cache.CacheManager;
import org.springframework.cache.annotation.EnableCaching;
import org.springframework.context.annotation.Bean;
import org.springframework.context.annotation.Configuration;
import org.springframework.data.redis.cache.RedisCacheConfiguration;
import org.springframework.data.redis.cache.RedisCacheManager;
import org.springframework.data.redis.connection.RedisConnectionFactory;
import org.springframework.data.redis.serializer.Jackson2JsonRedisSerializer;
import org.springframework.data.redis.serializer.RedisSerializationContext;
import org.springframework.data.redis.serializer.StringRedisSerializer;

import java.time.Duration;
import java.util.HashMap;
import java.util.Map;


/**
 * 第二中redis方案
 *
 * redis配置
 *
 */
@Configuration
@EnableCaching
public class RedisConfig2 {


	/**
	 * CacheManager为一个接口,RedisCacheManager为该接口的实现
	 * redisConnectionFactory 连接工厂
	 * cacheDefaults 默认配置
	 * @param redisConnectionFactory
	 * @return
	 */
	@Bean
	public CacheManager cacheManager(RedisConnectionFactory redisConnectionFactory){
		RedisCacheManager redisCacheManager = RedisCacheManager.builder(redisConnectionFactory)
				.cacheDefaults(defaultCacheConfig(10000))
				.withInitialCacheConfigurations(initCacheConfigMap())
				.transactionAware()
				.build();
		return redisCacheManager;

	}

	/**
	 * 默认配置中进行了序列化的配置
	 * @param second
	 * @return
	 */
	private RedisCacheConfiguration defaultCacheConfig(Integer second) {
		Jackson2JsonRedisSerializer jackson2JsonRedisSerializer = new Jackson2JsonRedisSerializer(Object.class);

		//解决查询缓存转换异常的问题
		ObjectMapper om = new ObjectMapper();
		om.setVisibility(PropertyAccessor.ALL, JsonAutoDetect.Visibility.ANY);
		om.enableDefaultTyping(ObjectMapper.DefaultTyping.NON_FINAL);
		jackson2JsonRedisSerializer.setObjectMapper(om);

		//配置序列化 解决乱码的问题
		RedisCacheConfiguration config = RedisCacheConfiguration.defaultCacheConfig()
				.entryTtl(Duration.ofSeconds(second))
				.serializeKeysWith(RedisSerializationContext.SerializationPair.fromSerializer(new StringRedisSerializer()))
				.serializeValuesWith(RedisSerializationContext.SerializationPair.fromSerializer(jackson2JsonRedisSerializer))
				.disableCachingNullValues();

		return config;

	}

	/**
	 * 针对不同的redis的key 有不同的过期时间
	 * @return
	 */
	private Map<String, RedisCacheConfiguration> initCacheConfigMap() {

		Map<String,RedisCacheConfiguration> configMap = new HashMap<>();
		configMap.put("Cache",this.defaultCacheConfig(1000));
		configMap.put("Cache1",this.defaultCacheConfig(1000));
		configMap.put("Cache2",this.defaultCacheConfig(1000));
		configMap.put("Cache3",this.defaultCacheConfig(1000));
		return configMap;
	}

}
代码实现
package com.zhaoyang.controller;

import com.zhaoyang.domain.Person;
import com.zhaoyang.enums.ExpireEnum;
import com.zhaoyang.service.PersonService;
import com.zhaoyang.util.RedisUtil;
import lombok.extern.slf4j.Slf4j;
import org.springframework.beans.factory.annotation.Autowired;
import org.springframework.web.bind.annotation.RequestMapping;
import org.springframework.web.bind.annotation.RestController;

import javax.annotation.Resource;


/*

redis和mysql同步!!!

                                        (1)辅:redis缓存数据(数据形式:Java对象)

controller -> service -> mapper ->

                                        (2)主:mysql持久数据库(数据形式:表记录)


策略

查询:redis->mysql

删除:redis->mysql

添加修改:mysql->redis

 */
@Slf4j
@RestController
@RequestMapping("/redis")
public class RedisController {

    @Resource
    private RedisUtil redisUtil;

    @Autowired
    private PersonService personService;

    // (1)添加:mysql,redis
    @RequestMapping("/m1")
    public boolean m1() {
        Person person = new Person();
        person.setName("abc");
        boolean boo = personService.save(person);
        if (boo) {
            redisUtil.set("" + person.getId(), person);
        }
        return boo;
    }

    // (2)查询:redis,mysql
    @RequestMapping("/m2")
    public Object m2(String key) {
        if (redisUtil.hasKey(key)) {
            return redisUtil.get(key);
        }
        Person person = personService.getById(key);
        redisUtil.set(key, person, ExpireEnum.UNREAD_MSG.getTime());
        return redisUtil.get(key);
    }

    // (3)删除:redis,mysql
    @RequestMapping("/m3")
    public boolean m3(String key) {
        redisUtil.del(key);
        boolean boo = personService.removeById(key);
        return boo;
    }

    // (4)修改:mysql->redis
    @RequestMapping("/m4")
    public boolean m4(String key, String name) {
        Person person = personService.getById(key);
        person.setName(name);
        boolean boo = personService.updateById(person);
        redisUtil.set(key, person);
        return true;
    }

}
注解实现
package com.zhaoyang.controller;

import com.zhaoyang.domain.Person;
import com.zhaoyang.service.PersonService;
import org.springframework.beans.factory.annotation.Autowired;
import org.springframework.cache.annotation.CacheEvict;
import org.springframework.cache.annotation.CachePut;
import org.springframework.cache.annotation.Cacheable;
import org.springframework.web.bind.annotation.RequestMapping;
import org.springframework.web.bind.annotation.RestController;

/*

@Cacheable查询
@CachePut添加/修改
@CacheEvict删除

 */
@RestController
@RequestMapping("/redis2")
public class RedisController2 {

    @Autowired
    PersonService personService;

    // (1)查询
    @RequestMapping("/m1")
    @Cacheable(value="Cache", key="##id")
    public Person m1(String id) {
        Person person = personService.getById(id);
        return person;
    }

    // (2)添加
    @RequestMapping("/m2")
    @CachePut(value="Cache", key="##person.id")
    public Person m2(Person person) {
        boolean b = personService.save(person);
        return person;
    }

    // (3)修改
    @RequestMapping("/m3")
    @CachePut(value="Cache", key="##person.id")
    public Person m3(Person person) {
        boolean b = personService.updateById(person);
        return person;
    }

    // (4)删除
    @RequestMapping("/m4")
    @CacheEvict(value="Cache", key="##id")
    public boolean m4(String id) {
        boolean b = personService.removeById(id);
        return b;
    }

}
15.Redis缓存常见问题
击穿

package com.zhaoyang.controller;

import com.zhaoyang.domain.Person;
import com.zhaoyang.service.PersonService;
import org.springframework.beans.factory.annotation.Autowired;
import org.springframework.data.redis.core.RedisTemplate;
import org.springframework.web.bind.annotation.PathVariable;
import org.springframework.web.bind.annotation.RequestMapping;
import org.springframework.web.bind.annotation.RestController;

import java.util.UUID;
import java.util.concurrent.TimeUnit;

// redis> SETNX key "Hello" 不存在key返回1

@RestController
public class RC1 {

    @Autowired
    private PersonService personService;

    @Autowired
    private RedisTemplate<String, Object> redisTemplate;

    @RequestMapping("/person1/{id}")
    public Person getUserById(@PathVariable String id){

        // 先从缓存中获取值
        Person person = (Person) redisTemplate.opsForValue().get(id);

        if(person == null){

            // 查询数据库之前加锁:同一个id生成唯一的uuid
            String lockKey = "lock_person_" + id;
            String lockValue = UUID.randomUUID().toString();

            try{

                Boolean lockResult = redisTemplate.opsForValue().setIfAbsent(lockKey, lockValue, 60, TimeUnit.SECONDS);

                if(lockResult != null && lockResult){
                    // 查询数据库
                    person = personService.getById(id);
                    if(person != null){
                        // 将查询到的数据加入缓存
                        redisTemplate.opsForValue().set(id, person, 300, TimeUnit.SECONDS);
                    }
                }

            }finally{

                // 释放锁
                if(lockValue.equals(redisTemplate.opsForValue().get(lockKey))){
                    redisTemplate.delete(lockKey);
                }

            }
        }
        return person;
    }
}
穿透

package com.zhaoyang.controller;

import com.zhaoyang.domain.Person;
import com.zhaoyang.service.PersonService;
import com.zhaoyang.util.BloomFilterUtil;
import org.springframework.beans.factory.annotation.Autowired;
import org.springframework.data.redis.core.RedisTemplate;
import org.springframework.web.bind.annotation.GetMapping;
import org.springframework.web.bind.annotation.PathVariable;
import org.springframework.web.bind.annotation.RestController;

import java.util.concurrent.TimeUnit;

// 缓存穿透:在Controller中查询数据时,先根据请求参数进行Bloom Filter的过滤

@RestController
public class RC2 {

    @Autowired
    private PersonService personService;

    @Autowired
    private RedisTemplate<String, Object> redisTemplate;

    @GetMapping("/person2/{id}")
    public Person getUserById(@PathVariable String id){

        // 先从布隆过滤器中判断此id是否存在
        if(BloomFilterUtil.mightConTAIn(id)){
            return null;
        }

        // 查询缓存数据
        Person person = (Person) redisTemplate.opsForValue().get(id);

        if(person == null){
            // 查询数据库
            person = personService.getById(id);
            if(person != null){
                // 将查询到的数据加入缓存
                redisTemplate.opsForValue().set(id, person, 300, TimeUnit.SECONDS);
            }else{
                // 查询结果为空,将请求记录下来,并在布隆过滤器中添加
                BloomFilterUtil.add(id);
            }
        }

        return person;
    }
}
雪崩

package com.zhaoyang.controller;

import com.zhaoyang.domain.Person;
import org.springframework.beans.factory.annotation.Autowired;
import org.springframework.cache.CacheManager;
import org.springframework.cache.annotation.Cacheable;
import org.springframework.data.redis.core.RedisTemplate;
import org.springframework.web.bind.annotation.GetMapping;
import org.springframework.web.bind.annotation.PathVariable;
import org.springframework.web.bind.annotation.RestController;

// 注意:RedisConfig2注销不启动
// 使用多级缓存架构,通过增加一层代理层来解决。

@RestController
public class RC3 {

    @Autowired
    private RedisTemplate<String, Object> redisTemplate;

    @Autowired
    private CacheManager ehCacheManager;

    @GetMapping("/person3/{id}")
    @Cacheable(value="userCache", key="##id")
    public Person getUserById(@PathVariable String id){

        id = "Cache::" + id;

        // 先从Ehcache缓存中获取
        Person person = (Person) ehCacheManager.getCache("userCache").get(id);

        if(person == null){
            // 再从Redis缓存中获取
            person = (Person) redisTemplate.opsForValue().get(id);
            if(person != null){
                ehCacheManager.getCache("userCache").put(id, person);
            }
        }
        return person;
    }
}
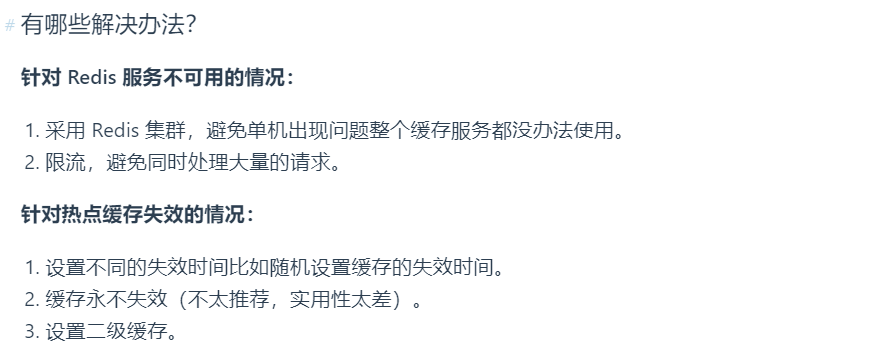
16.Redis总结




17.Redis配置
单机配置
(一)Redis配置IP地址访问

1. 打开 redis.windows.config文件(linux对应redis.conf文件)将 NETWORK 下 bind 127.0.0.1 注释掉
并将 protected-mode yes 改为 protected-mode no;

2. 同理修改 redis.windows.server.config 文件中相应内容;

3. 重启 Redis 服务,即可使用 IP 访问 Redis了;

特别注意:cmd命令启动服务
redis-server.exe redis.windows.conf


(一)Springboot配置Redis

pom.xml

<dependency>
  <groupId>org.springframework.boot</groupId>
  <artifactId>spring-boot-starter-data-redis</artifactId>
</dependency>

application.yml

spring:
    redis:
    host: 127.0.0.1
    port: 6379
    database: 0
    password:
    timeout: 2000
集群配置
(1)官方规定:搭建redis集群最少需要6个节点


(2)修改每个redis的redis.windows.conf文件
注意:配置完之前先不要启动redis,否则会生成dump.rdb,导致集群启动失败

protected-mode yes

port 6379(每个redis的端口都需要不同)

cluster-enabled yes

cluster-config-file nodes-端口.conf

## dbfilename dump.rdb

## appendfilename "appendonly.aof"


(3)启动每个redis
使用命令行启动每个redis、启动完成后,会发现该redis是以集群模式启动
redis-server.exe redis.windows.conf


(4) 启动集群命令
redis-cli.exe --cluster create 192.168.3.41:6381 192.168.3.41:6382 192.168.3.41:6383 192.168.3.41:6384 192.168.3.41:6385 192.168.3.41:6386 --cluster-replicas 1

使用以上命令启动集群,前面启动redis只是启动redis了,每个redis并没有加入到集群中
至此windows的集群环境就搭建成功了


(5)输入任意一个redis都能成功访问redis集群
redis-cli.exe -c -h 192.168.3.41 -p 6381
redis-cli.exe -c -h 192.168.3.41 -p 6382
redis-cli.exe -c -h 192.168.3.41 -p 6383
redis-cli.exe -c -h 192.168.3.41 -p 6384
redis-cli.exe -c -h 192.168.3.41 -p 6385
redis-cli.exe -c -h 192.168.3.41 -p 6386

cluster slots

cluster nodes


(6)启动服务问题解决方案:
停止服务、删除rdb、aof、nodes-6386.conf、重启服务
集群实现
一、导入POM.XML

  <!--默认是lettuce客户端-->
        <dependency>
            <groupId>org.springframework.boot</groupId>
            <artifactId>spring-boot-starter-data-redis</artifactId>
        </dependency>

        <!-- redis依赖commons-pool 这个依赖一定要添加 -->
        <dependency>
            <groupId>org.apache.commons</groupId>
            <artifactId>commons-pool2</artifactId>
        </dependency>


二、编写application.yml

spring:
  redis:
    password:
    lettuce:  ##lettuce连接池配置
      pool:
        max-active: 8
        max-idle: 8
        min-idle: 0
        max-wait: 1000
      shutdown-timeout: 100
    cluster:  ##集群配置
      nodes:
        - 192.168.3.41:6381
        - 192.168.3.41:6382
        - 192.168.3.41:6383
        - 192.168.3.41:6384
        - 192.168.3.41:6385
        - 192.168.3.41:6386
      max-redirects: 3

三、RedisConfig编写

@Configuration
@Log
public class RedisConfig extends CachingConfigurerSupport {

    /**
     * 自定义缓存key的生成策略。默认的生成策略是看不懂的(乱码内容) 通过Spring 的依赖注入特性进行自定义的配置注入并且此类是一个配置类可以更多程度的自定义配置
     *
     * @return
     */
    @Bean
    @Override
    public KeyGenerator keyGenerator() {
        return new KeyGenerator() {
            @Override
            public Object generate(Object target, Method method, Object... params) {
                StringBuilder sb = new StringBuilder();
                sb.append(target.getClass().getName());
                sb.append(method.getName());
                for (Object obj : params) {
                    sb.append(obj.toString());
                }
                log.info("打印:"+sb.toString());
                return sb.toString();
            }
        };
    }

    /**
     * 缓存配置管理器
     */
    @Bean
    public CacheManager cacheManager(LettuceConnectionFactory factory) {
        //以锁写入的方式创建RedisCacheWriter对象
        RedisCacheWriter writer = RedisCacheWriter.lockingRedisCacheWriter(factory);
        //创建默认缓存配置对象
        RedisCacheConfiguration config = RedisCacheConfiguration.defaultCacheConfig();
        RedisCacheManager cacheManager = new RedisCacheManager(writer, config);
        return cacheManager;
    }


    @Bean
    public RedisTemplate<String,Object> redisTemplate(LettuceConnectionFactory factory){
        RedisTemplate<String,Object> template = new RedisTemplate <>();


        template.setConnectionFactory(factory);


        Jackson2JsonRedisSerializer jackson2JsonRedisSerializer = new Jackson2JsonRedisSerializer(Object.class);
        ObjectMapper om = new ObjectMapper();
        om.setVisibility(PropertyAccessor.ALL, JsonAutoDetect.Visibility.ANY);
        om.enableDefaultTyping(ObjectMapper.DefaultTyping.NON_FINAL);
        jackson2JsonRedisSerializer.setObjectMapper(om);

        StringRedisSerializer stringRedisSerializer = new StringRedisSerializer();

        // 在使用注解@Bean返回RedisTemplate的时候,同时配置hashKey与hashValue的序列化方式。
        // key采用String的序列化方式
        template.setKeySerializer(stringRedisSerializer);
        // value序列化方式采用jackson
        template.setValueSerializer(jackson2JsonRedisSerializer);

        // hash的key也采用String的序列化方式
        template.setHashKeySerializer(stringRedisSerializer);
        // hash的value序列化方式采用jackson
        template.setHashValueSerializer(jackson2JsonRedisSerializer);
        template.afterPropertiesSet();
        return template;
    }

}