前端框架
约 5693 字大约 19 分钟
(1)预备知识
传统开发
模块开发

Vite开发

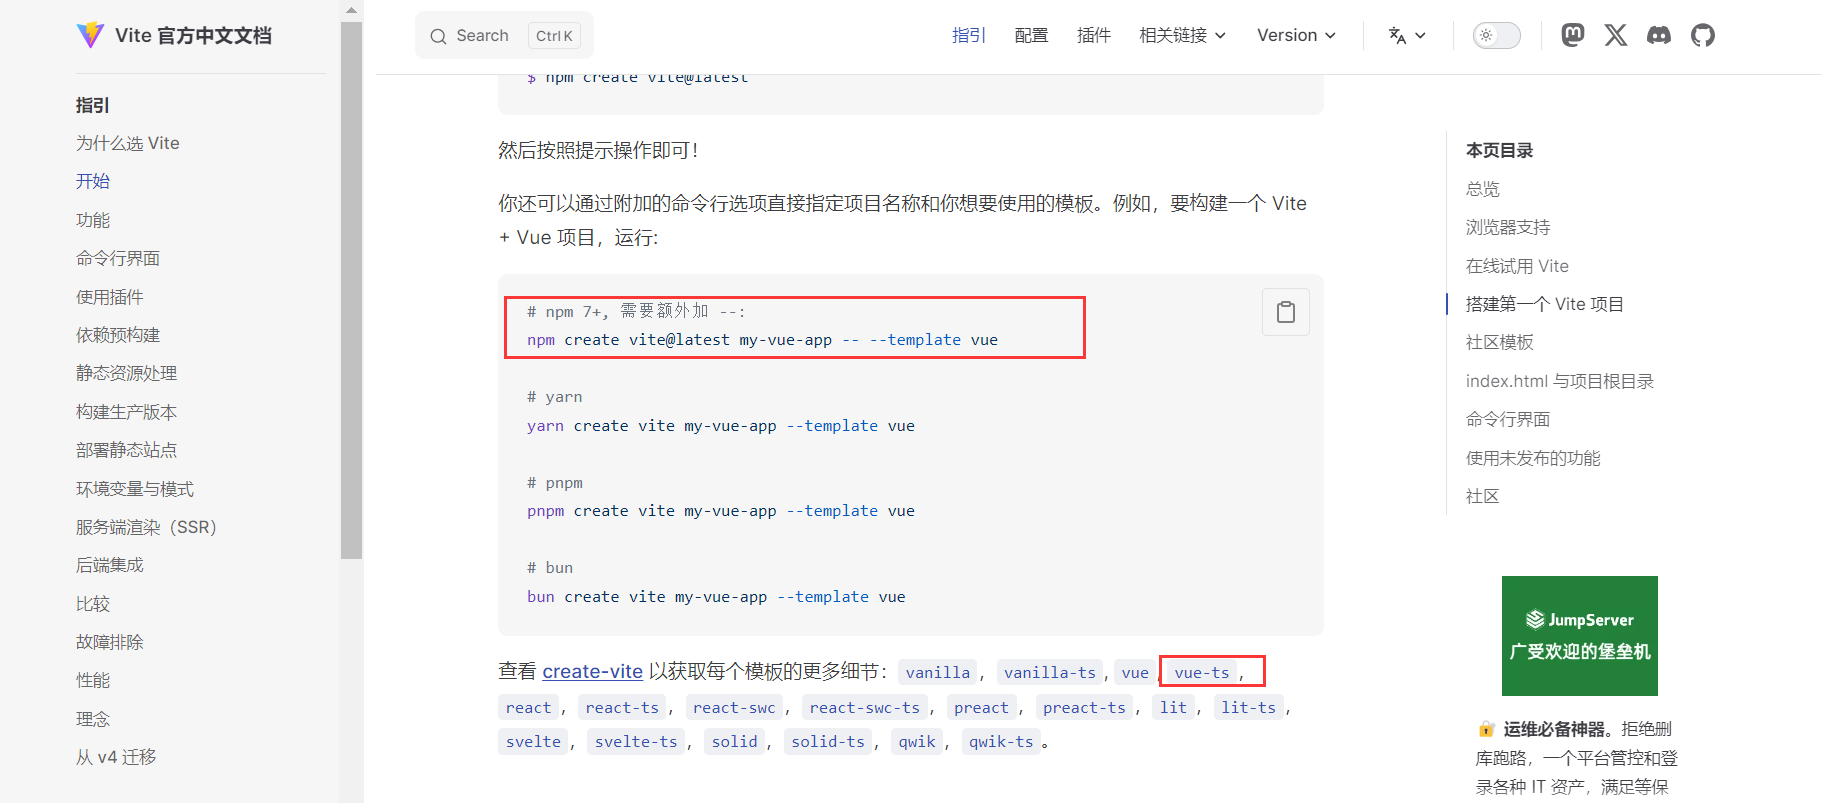
npm create vite@latest vue3-ts-basic -- --template vue-ts
npm install
npm run dev
http://127.0.0.1:5173/

(2)Vue2核心语法
开发环境
node -v
npm -v
npm i @vue/cli -g
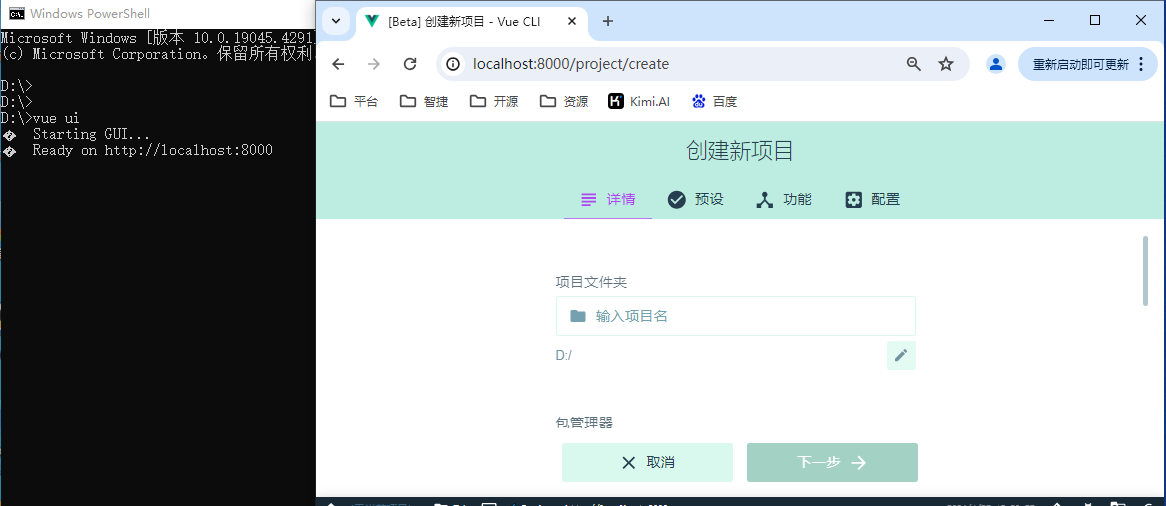
vue create my-vue3-project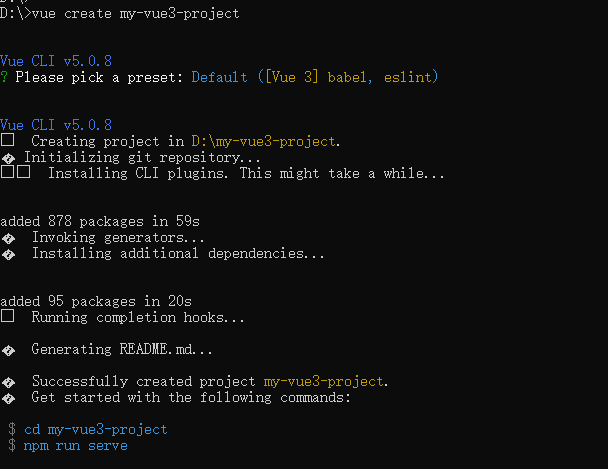
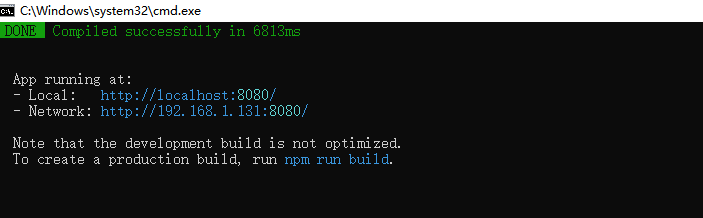
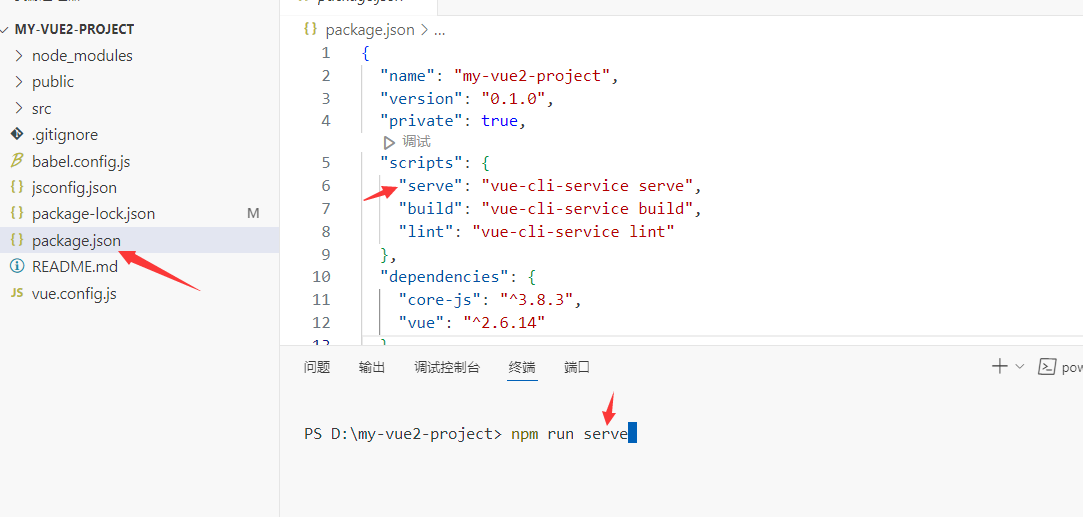
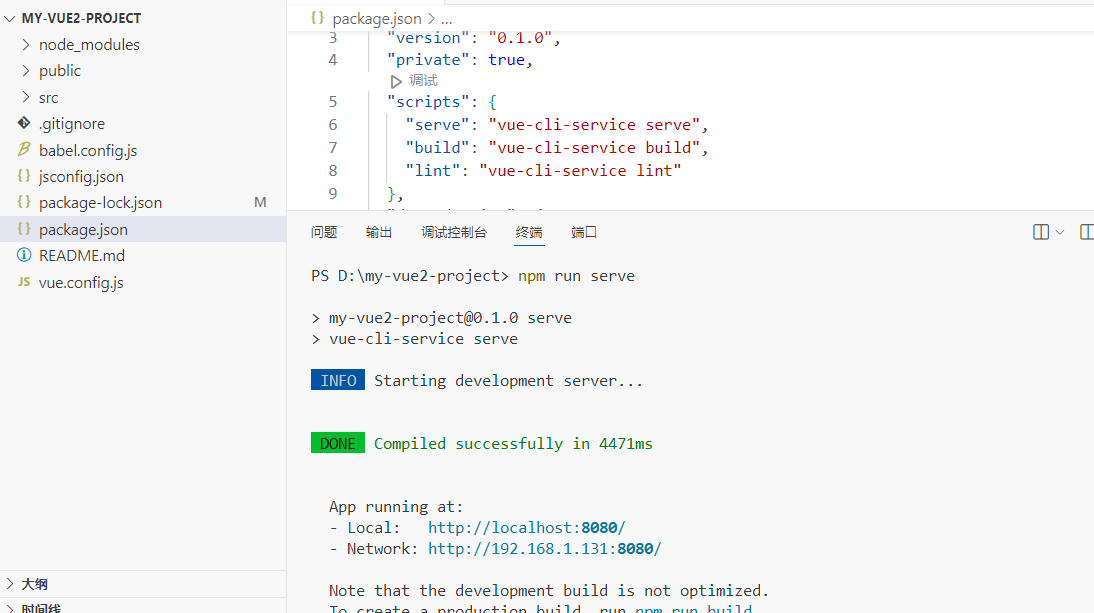
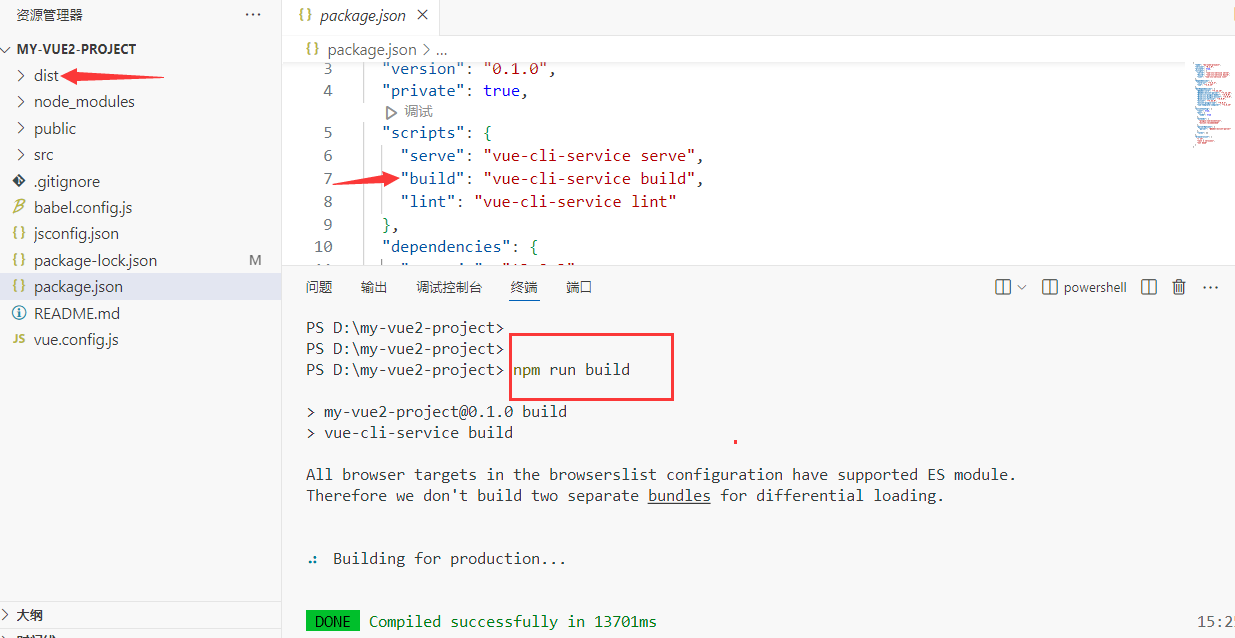
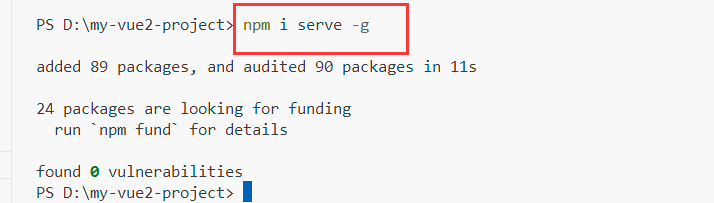
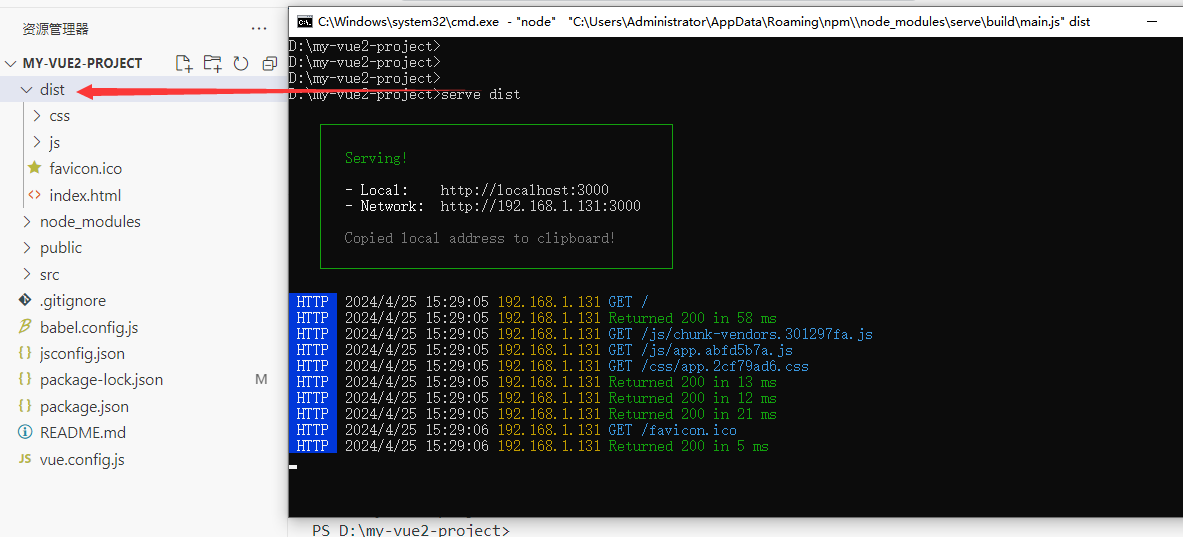
部署发布
组件安装
在Vue 2中
npm install vue-router
npm install vuex --save

在Vue 3中
路由管理通常使用的是Vue Router 4,而状态管理库Vuex也已经发展到了Vuex 4。
npm install vue-router@4
npm install vuex@next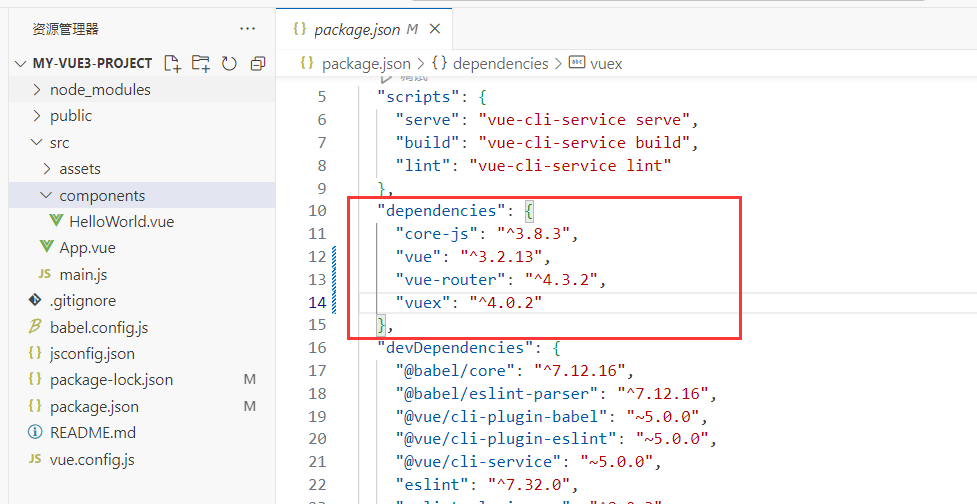
计算属性
<template>
    <div>
        <h3>计算属性</h3>
        <h6>methods没有缓存</h6>
        <h6>computed有缓存、计算属性没有括号</h6>
        <div>
            {{ m1() }}{{ m1() }}{{ m1() }}
        </div>
        <div>
            {{ m2 }}{{ m2 }}{{ m2 }}
        </div>
    </div>
</template>
<script>
export default {
    name:'A',
    data(){
        return {
            num:1982
        }
    },
    methods:{
        m1(){
            console.log('执行methods方法')
            return this.num
        }
    },
    computed:{
        m2() {
            console.log('执行computed方法')
            return this.num
        }
    }
}
</script>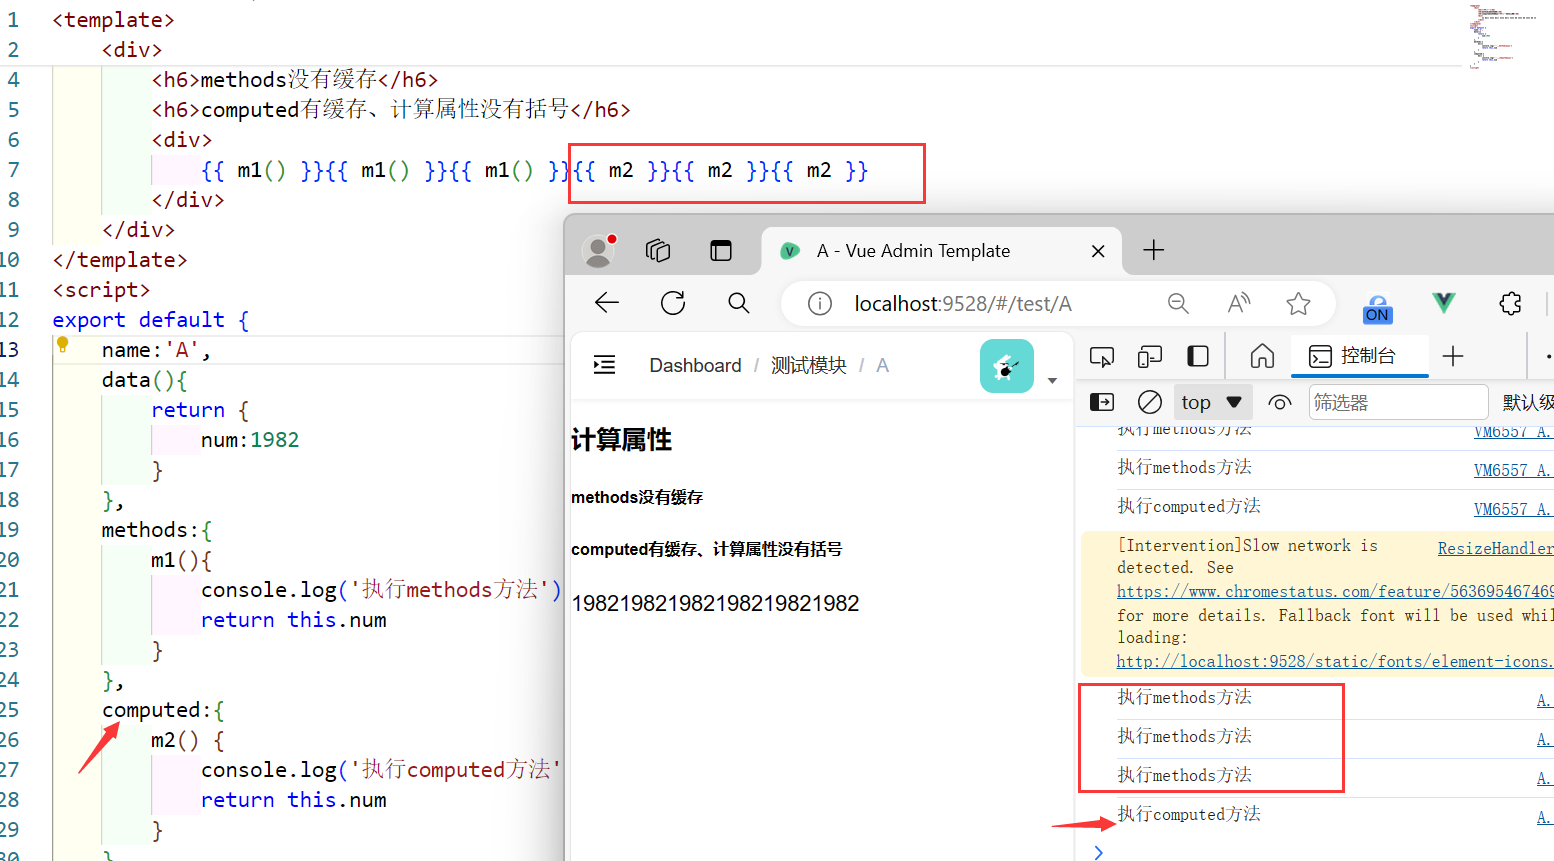
侦听器
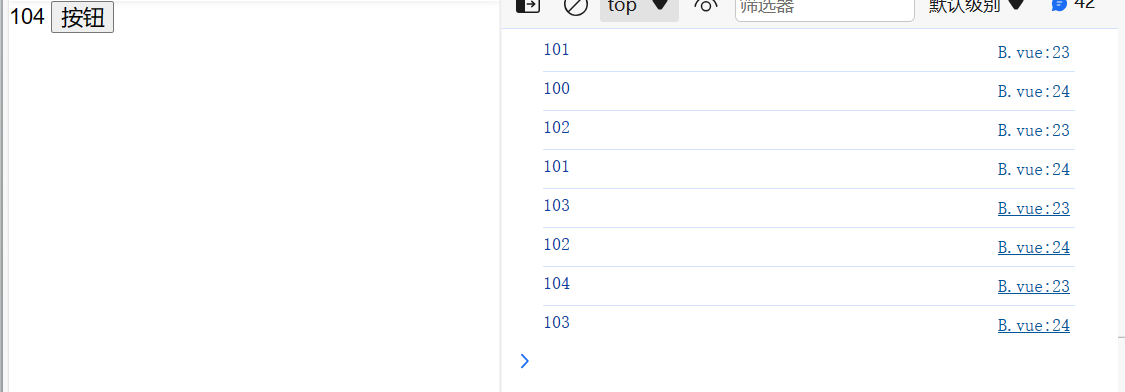
<template>
<div>
{{ num }}
<button @click="m()">按钮</button>
</div>
</template>
<script>
export default {
name:'B',
data(){
return {
num:100
}
},
methods: {
m(){
this.num++
}
},
watch:{
num(newValue, oldValue) {
console.log(newValue)
console.log(oldValue)
}
}
}
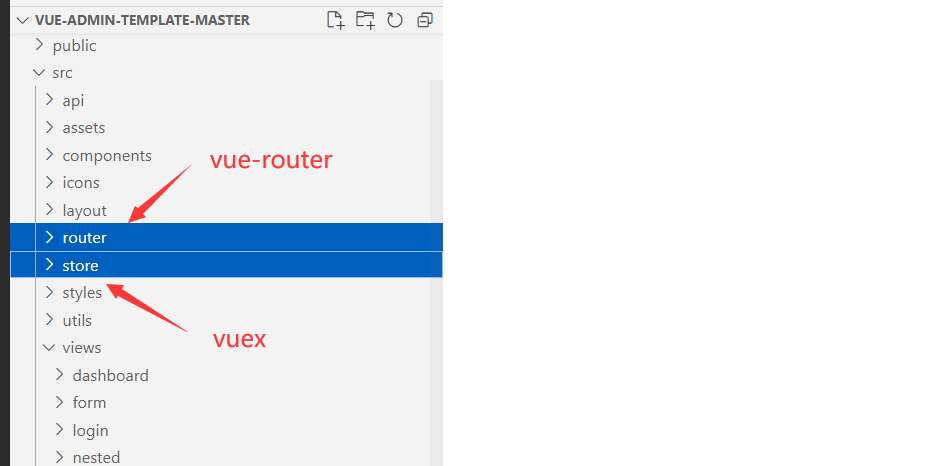
</script>Vue-router和Vuex配置
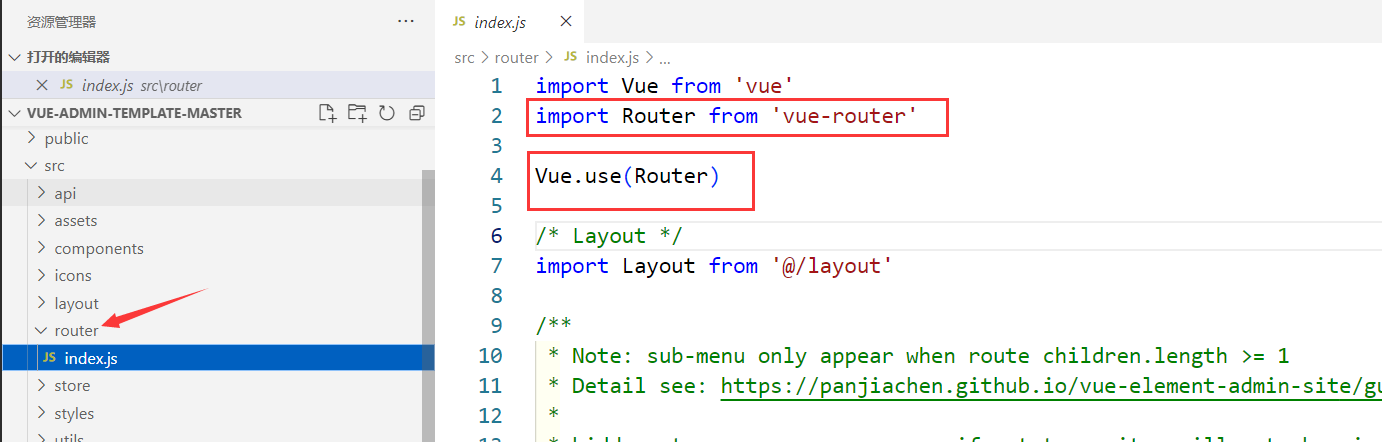

Vue-router路由跳转
<template>
<div>
<h3>C页面</h3>
<nav>
<router-link to="/test/D">路径跳转到D组件</router-link><br>
<router-link to="/test/E">路径跳转到E组件</router-link><br>
</nav>
<nav>
<router-link :to="{name:'D'}">名字跳转到D组件</router-link><br>
<router-link :to="{name:'E'}">名字跳转到E组件</router-link><br>
</nav>
<router-view />
</div>
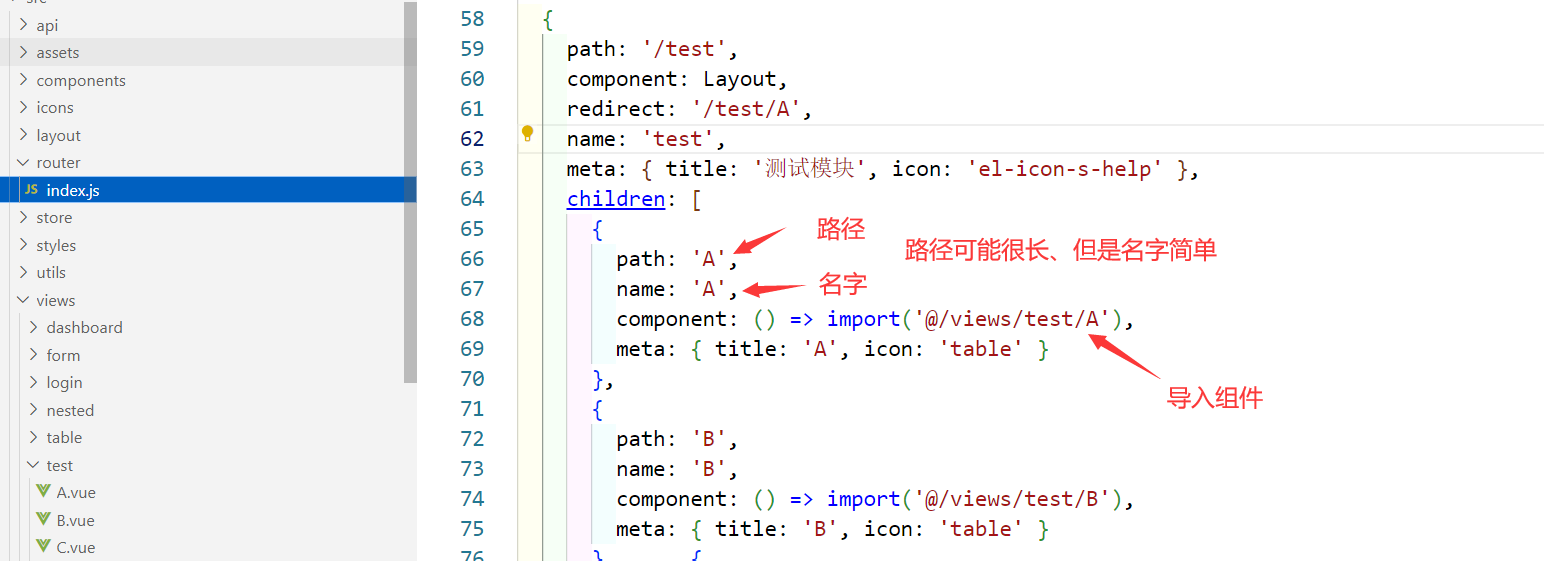
</template>Vue-router动态路由
C.vue
<template>
    <div>
        <h3>C页面</h3>
        <nav>
            <router-link to="/test/D/30">路径动态路由</router-link><br>
        </nav>

        <nav>
        <router-link :to="{name:'D',params:{id:28}}">名字动态路由</router-link>
        </nav>
        <router-view />
    </div>
</template>

router/index.js
{
        path: 'D/:id',
        props: true,
        name: 'D',
        component: () => import('@/views/test/D'),
        meta: { title: 'D', icon: 'table' }
      }

D.vue
<template>
    <div>
        <h1>D页面{{ id }}</h1>
    </div>
</template>

<script>
export default {
    name:'D',
    props:['id']
}
</script>
Vue-router编程导航
C.vue
created(){
setTimeout(()=>{
this.$router.push({name:'D',query:{data:'数据'}})
},3000)
}
D.vue
created(){
console.log(this.$route.query)
}
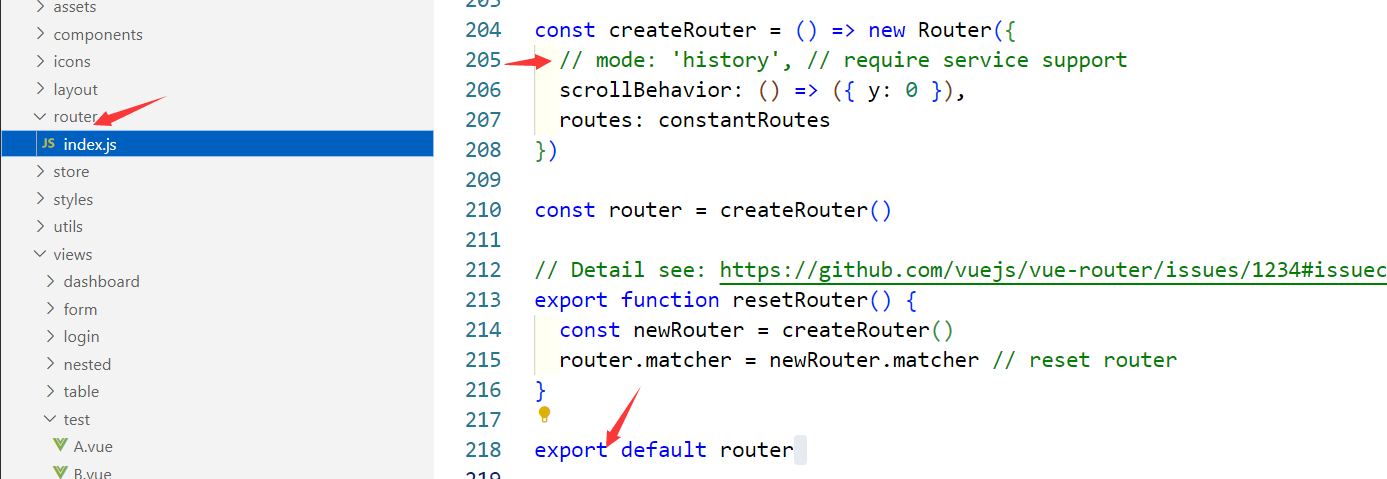
router/index.js路由守卫、导航守卫、每次路由跳转都会触发、next表示跳转下去
router.beforeEach((to, from, next) => {
console.log('路由触发了')
next()
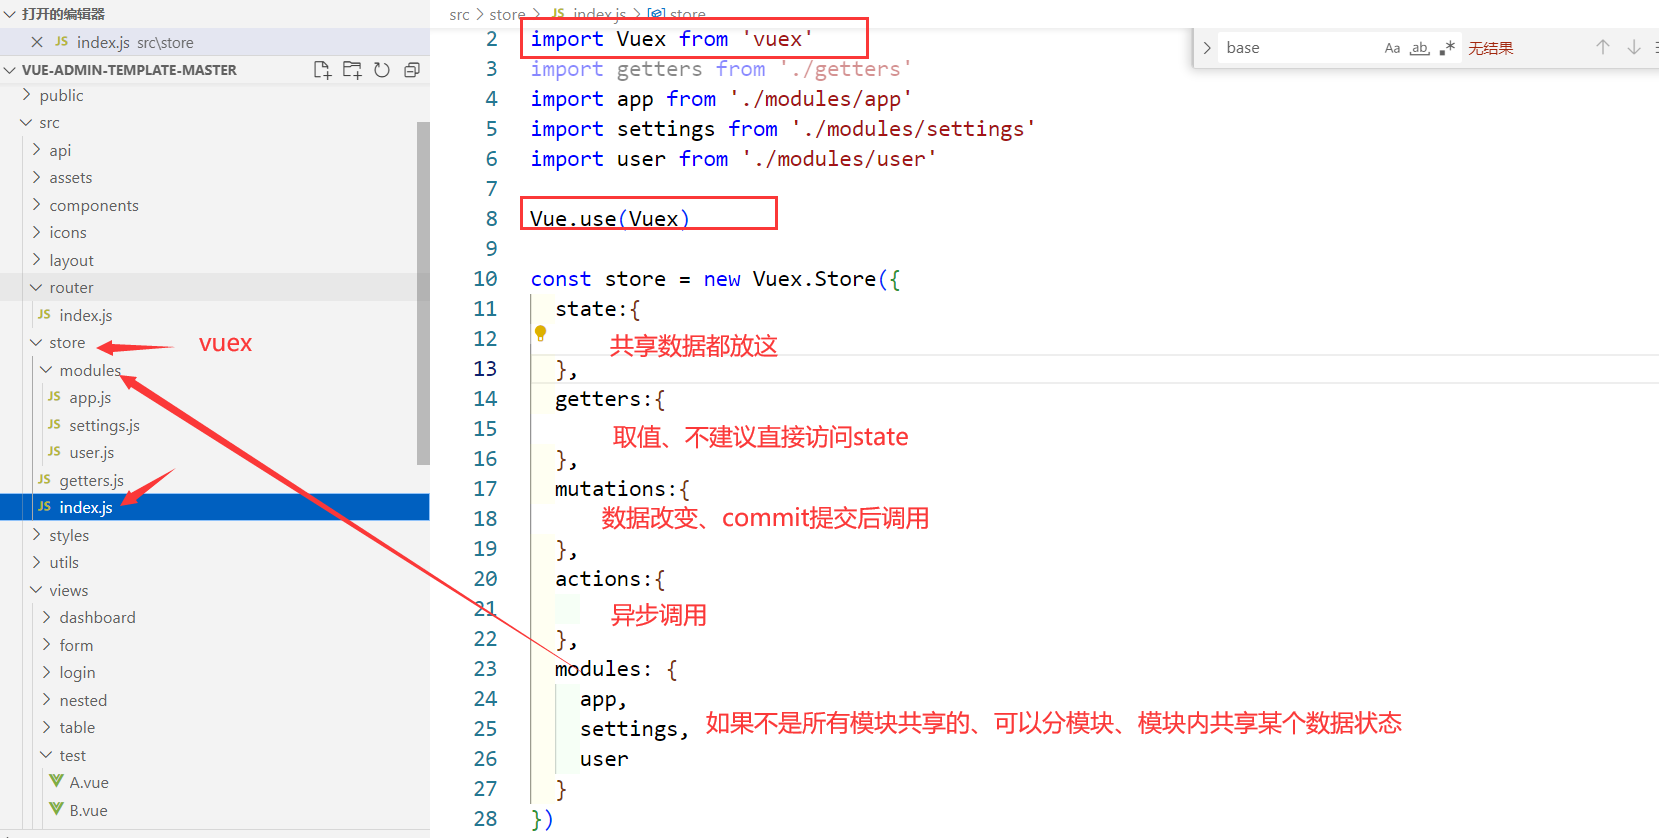
})Vuex-state
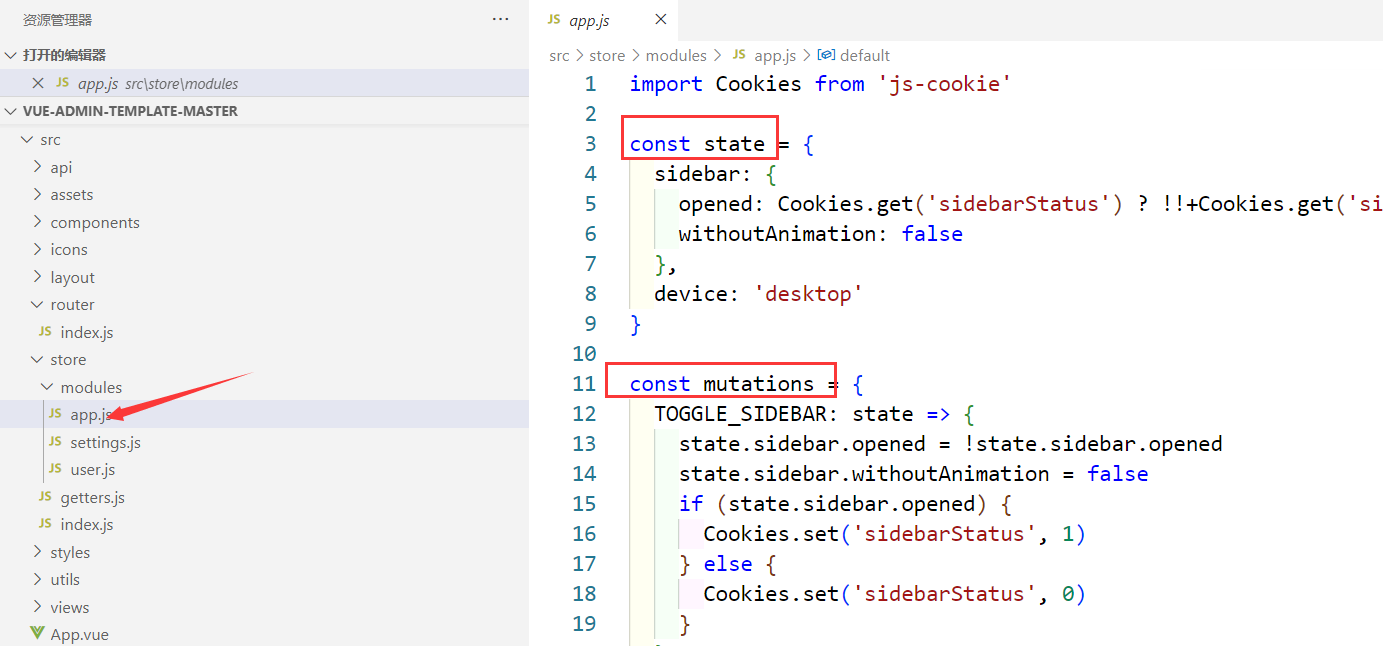
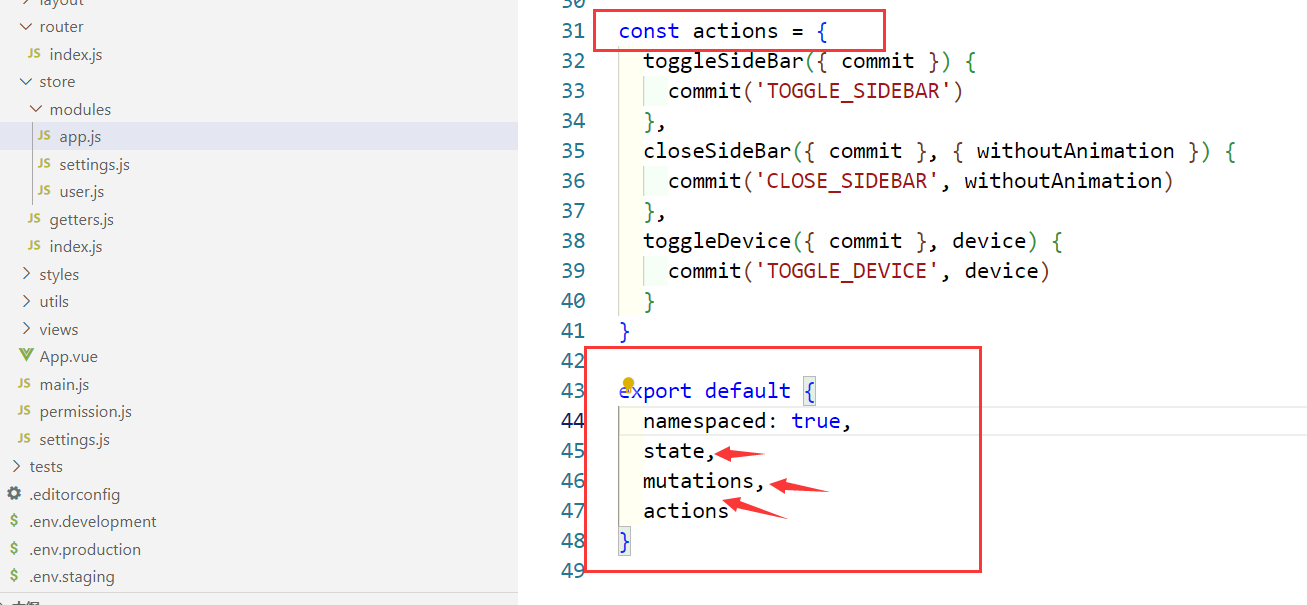
store/index.js
const store = new Vuex.Store({
  state:{
    count: 100
  },
  mutations:{

  },
  actions:{

  },
  modules: {
    app,
    settings,
    user
  },
  getters
})

E.vue
    created(){
        console.log(this.$store.state.count)
    }
Vuex-mutations
store/index.js

const store = new Vuex.Store({
  state:{
    count: 100
  },
  mutations:{
    m1(state, num){
      state.count += num
      console.log('mutations执行了' + state.count)
    }
  },
  actions:{

  },
  modules: {
    app,
    settings,
    user
  },
  getters
})

E.vue
    methods: {
        x(){
            // 说明:参数m1是mutations定义的方法名
            this.$store.commit('m1', 1)
            this.$store.commit('m1', 2)
            this.$store.commit('m1', 3)
        }
    }
Vuex-actions
store/index.js
const store = new Vuex.Store({
  state:{
    count: 100
  },
  mutations:{
    m1(state, num){
      state.count += num
      console.log('mutations执行了' + state.count)
    }
  },
  actions:{
    m2(state, num){
      setTimeout(()=>{
        store.commit('m1', num)
      },3000)
    }
  },
  modules: {
    app,
    settings,
    user
  },
  getters
})

E.vue
    methods: {
        x(){
            this.$store.commit('m1', 1)
            this.$store.commit('m1', 2)
            // 说明:调用actions中的异步方法m2、因为是异步所以结果为:1、2、3、10
            this.$store.dispatch('m2', 10)
            this.$store.commit('m1', 3)
        }
    }
Vuex-getters
store/index.js
const store = new Vuex.Store({
  state:{
    count: 100
  },
  mutations:{
    m1(state, num){
      state.count += num
      console.log('mutations执行了' + state.count)
    }
  },
  actions:{
    m2(state, num){
      setTimeout(()=>{
        store.commit('m1', num)
      },3000)
    }
  },
  modules: {
    app,
    settings,
    user
  },
  getters:{// 监听state值的变化
    getCount(state){
      console.log('getters执行了')
      return state.count
    }
  }
})

E.vue
    methods: {
        x(){
            this.$store.commit('m1', 1)
            this.$store.commit('m1', 2)
            // 说明:调用actions中的异步方法m2、因为是异步所以结果为:1、2、3、10
            this.$store.dispatch('m2', 10)
            this.$store.commit('m1', 3)
            // 注意:// 因为只改变了一次、所以只执行一次
            console.log(this.$store.getters.getCount)
            console.log(this.$store.getters.getCount)
            console.log(this.$store.getters.getCount)
            console.log(this.$store.getters.getCount)
            console.log(this.$store.getters.getCount)
        }
    }
Vuex-modules

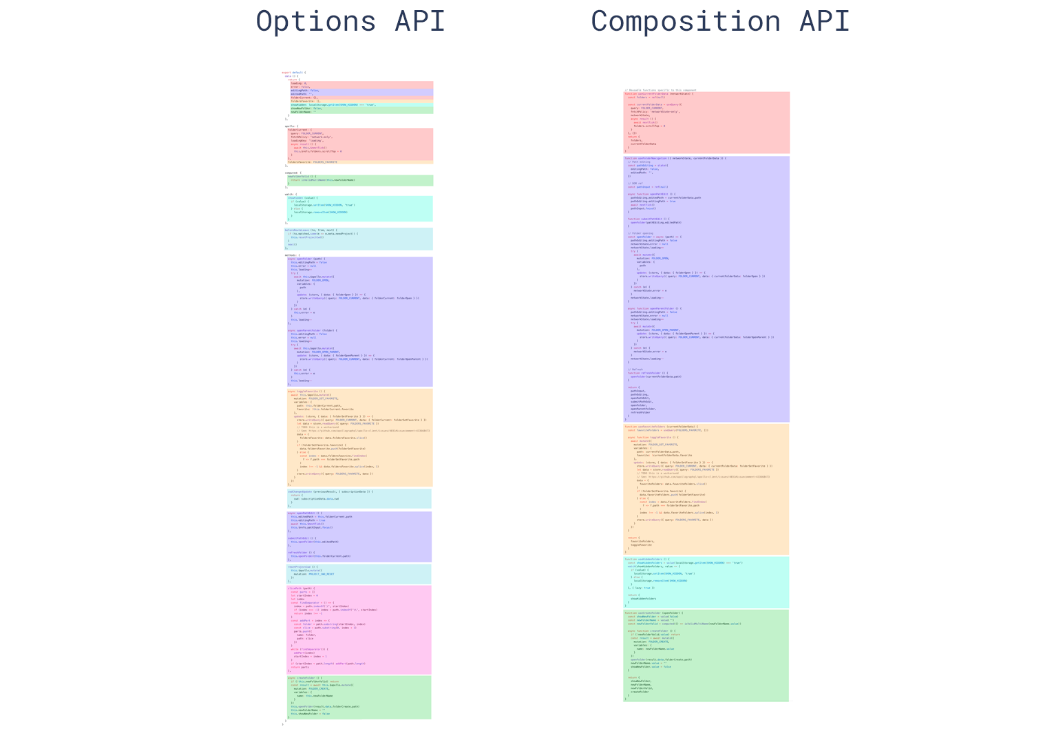
(3)Vue3核心语法一
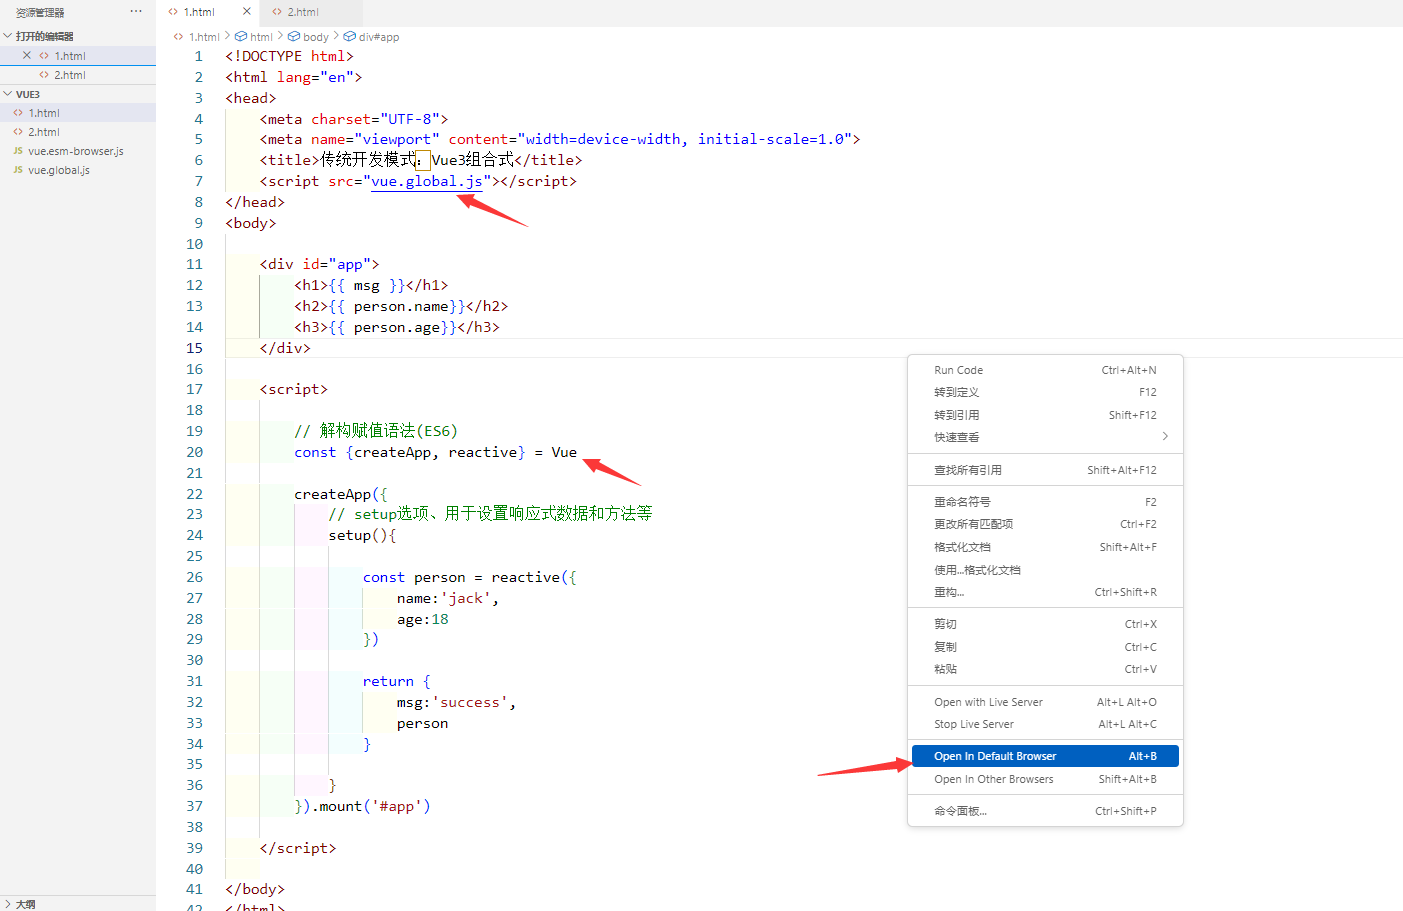
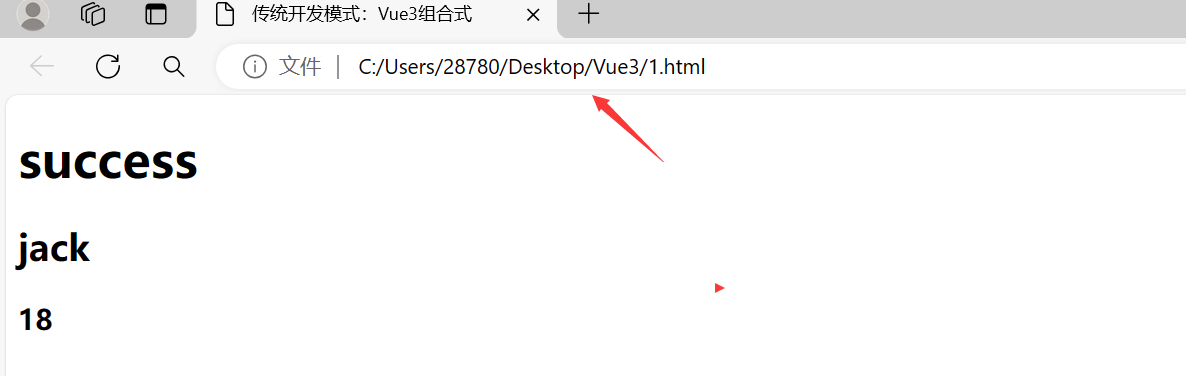
传统开发模式:Vue3组合式
<!DOCTYPE html>
<html lang="en">
<head>
<meta charset="UTF-8">
<meta name="viewport" content="width=device-width, initial-scale=1.0">
<title>传统开发模式:Vue3组合式</title>
<script src="vue.global.js"></script>
</head>
<body>
<div id="app">
<h1>{{ msg }}</h1>
<h2>{{ data.name}}</h2>
<h3>{{ data.age}}</h3>
</div>
<script>
// 解构赋值语法(ES6)
const {createApp, reactive} = Vue
createApp({
// setup选项、用于设置响应式数据和方法等
setup(){
const data = reactive({
name:'jack',
age:18
})
return {
msg:'success',
data
}
}
}).mount('##app')
</script>
</body>
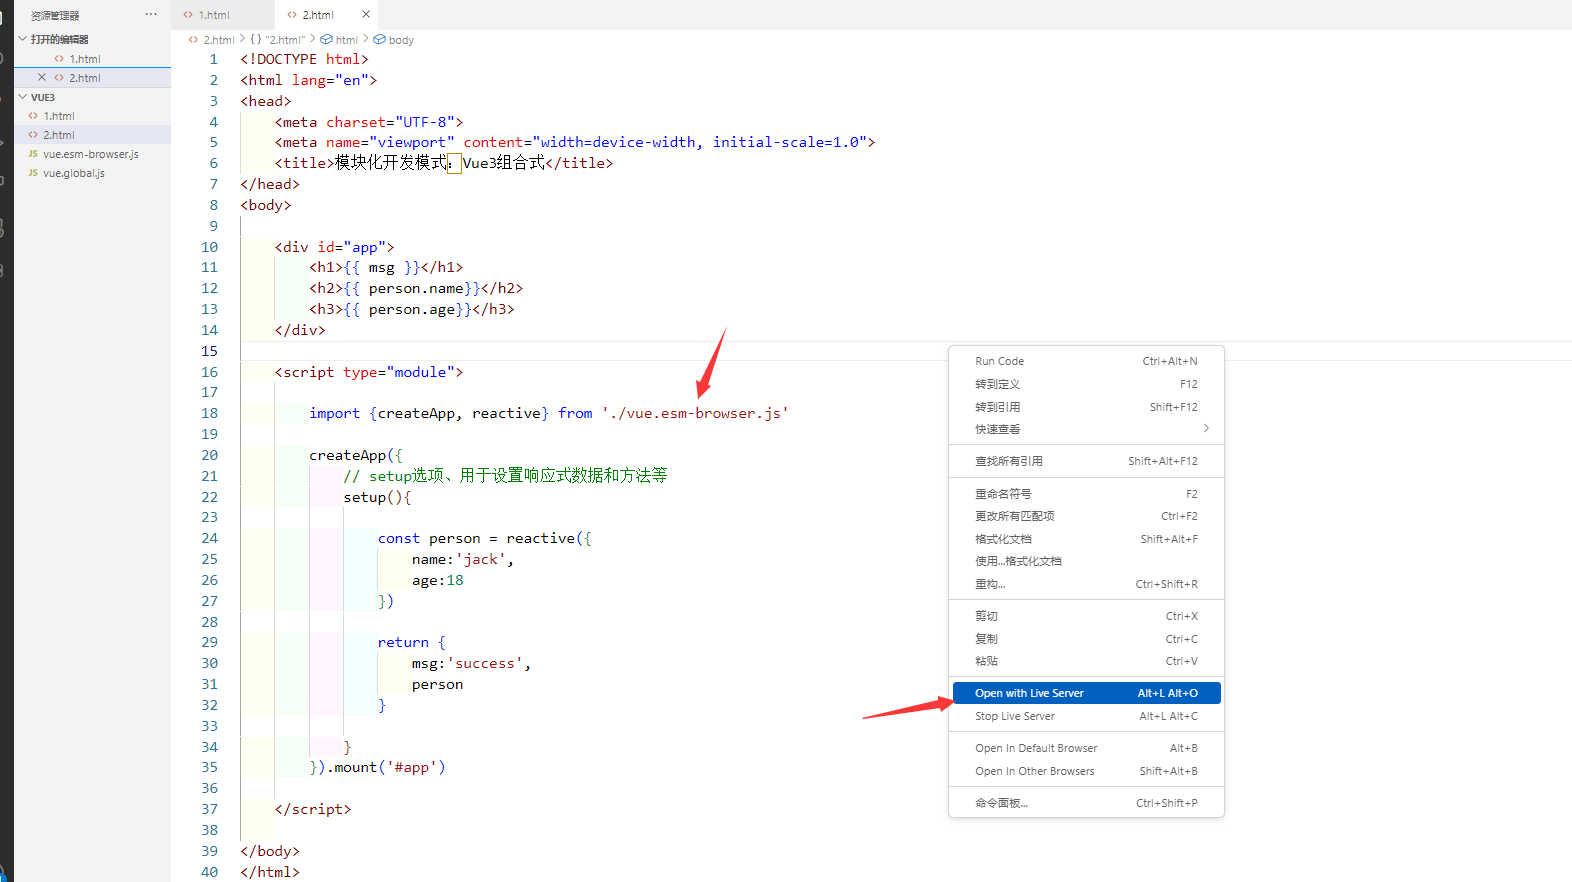
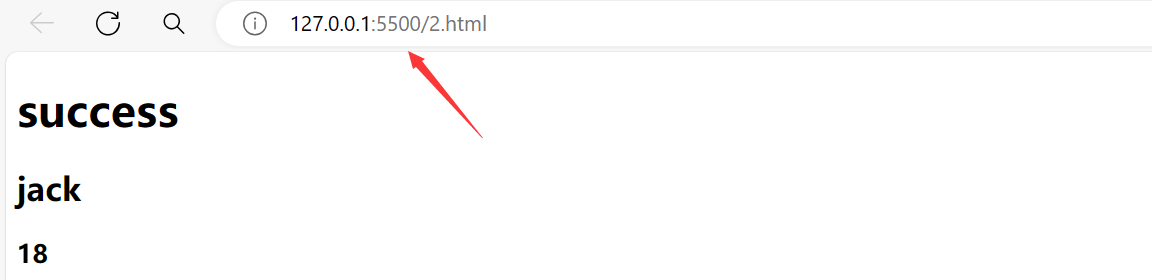
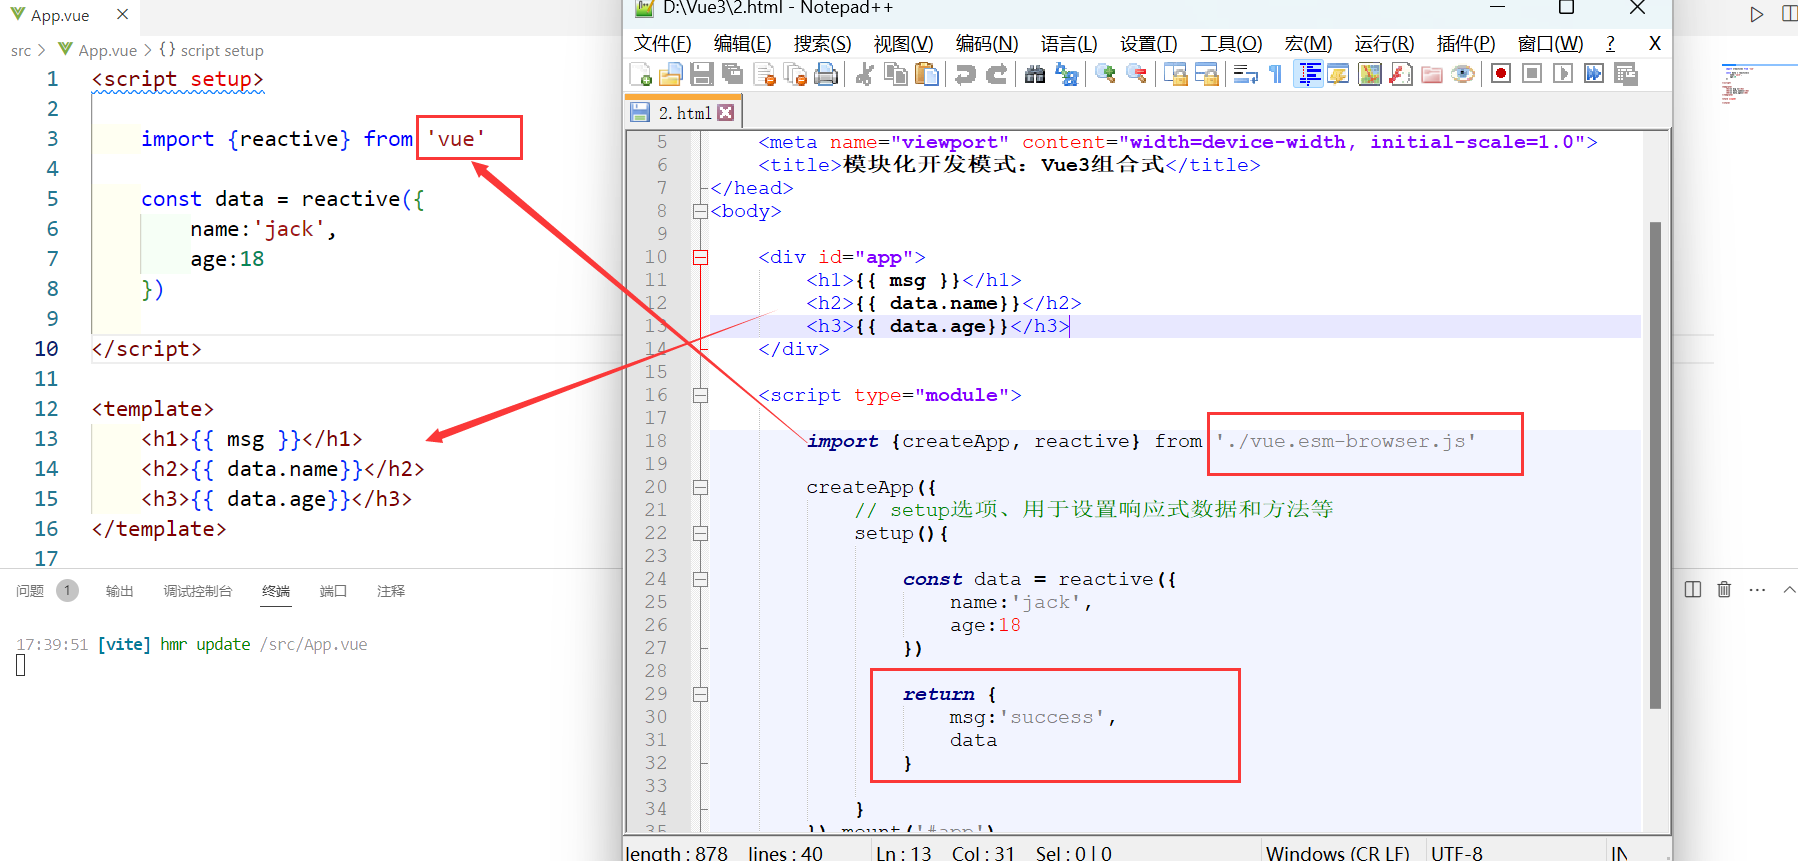
</html>模块化开发模式:Vue3组合式
<!DOCTYPE html>
<html lang="en">
<head>
    <meta charset="UTF-8">
    <meta name="viewport" content="width=device-width, initial-scale=1.0">
    <title>模块化开发模式:Vue3组合式</title>
</head>
<body>

    <div id="app">
        <h1>{{ msg }}</h1>
        <h2>{{ data.name}}</h2>
        <h3>{{ data.age}}</h3>
    </div>

    <script type="module">

        import {createApp, reactive} from './vue.esm-browser.js'

        createApp({
            // setup选项、用于设置响应式数据和方法等
            setup(){

                const data = reactive({
                    name:'jack',
                    age:18
                })

                return {
                    msg:'success',
                    data
                }

            }
        }).mount('##app')

    </script>

</body>
</html>
ref和reactive
<!DOCTYPE html>
<html lang="en">
<head>
    <meta charset="UTF-8">
    <meta name="viewport" content="width=device-width, initial-scale=1.0">
    <title>ref和reactive</title>
</head>
<body>

    <div id="app">

        <h3>ref用于存储单个基本类型的数据、如数字、字符串等</h3>
        <h3>使用ref创建的响应式对象、需要通过value属性来访问和修改</h3>
        <h4>{{ number }}</h4>

        <h3>reactive用于存储复杂数据类型、如对象或数组等</h3>
        <h3>使用reactive创建的响应式对象、可以直接通过属性名来访问和修改</h3>
        <h4>{{ data.name }}</h4>
        <h4>{{ data.age }}</h4>


    </div>

    <script type="module">

        import {createApp, reactive, ref} from './vue.esm-browser.js'

        createApp({
            // setup选项、用于设置响应式数据和方法等
            setup(){

                const number = ref(10)
                number.value = 20

                const data = reactive({
                    name:'jack',
                    age:18
                })
                person.name = 'stephen'

                return {
                    msg:'success',
                    data,
                    number
                }

            }
        }).mount('##app')

    </script>

</body>
</html>
绑定事件v-on简写@
<!DOCTYPE html>
<html lang="en">
<head>
    <meta charset="UTF-8">
    <meta name="viewport" content="width=device-width, initial-scale=1.0">
    <title>绑定事件v-on简写@</title>
</head>
<body>

    <div id="app">

        <h3>{{ msg }}</h3>

        <h3>{{ data.name }}</h3>
        <h3>{{ data.age }}</h3>

        <button v-on:click="edit">按钮</button>  <br>

        <button @click="edit">按钮</button> <br>

        <input type="text" @keyup.enter="add(10)"> <br>
        <input type="text" @keyup.space="add(10)"> <br>
        <input type="text" @keydown.tab="add(10)"> <br>
        <input type="text" @keyup.ctrl.a="add(10)"> <br>

    </div>

    <script type="module">

        import {createApp, reactive} from './vue.esm-browser.js'

        createApp({
            // setup选项、用于设置响应式数据和方法等
            setup(){

                const data = reactive({
                    name:'jack',
                    age:18
                })

                // 注意:定义的方法也需要添加到return内
                const edit = () => {
                    data.name = '张三'
                }

                const add = (a) => {
                    data.age += a
                }

                return {
                    msg:'success',
                    data,
                    edit,
                    add
                }

            }
        }).mount('##app')

    </script>

</body>
</html>
显示和隐藏v-show
<!DOCTYPE html>
<html lang="en">
<head>
    <meta charset="UTF-8">
    <meta name="viewport" content="width=device-width, initial-scale=1.0">
    <title>显示和隐藏v-show</title>
</head>
<body>

    <div id="app">

        <h3>{{ msg.show }}</h3>

        <button @click="edit()">按钮</button>

        <div v-show="msg.show">大连赵哥</div>

    </div>

    <script type="module">

        import {createApp, reactive} from './vue.esm-browser.js'

        createApp({
            // setup选项、用于设置响应式数据和方法等
            setup(){

                const msg = reactive({
                    show:true
                })

                const edit = () => {
                    msg.show = !msg.show
                }

                return {
                    msg,
                    edit
                }

            }
        }).mount('##app')

    </script>

</body>
</html>
条件渲染v-if
<!DOCTYPE html>
<html lang="en">
<head>
    <meta charset="UTF-8">
    <meta name="viewport" content="width=device-width, initial-scale=1.0">
    <title>条件渲染v-if</title>
</head>
<body>

    <div id="app">

        <h4>v-show通过css的display属性来控制元素的显示和隐藏、适用频繁切换显示状态</h4>
        <h4>v-if用于对元素进行条件渲染true渲染元素false不渲染、适用较少改变场景、因为频繁DOM操作</h4>

        <h3>{{ msg.show }}</h3>

        <button @click="edit()">按钮</button>

        <div v-if="msg.show">大连赵哥</div>

        <div v-if="false">1</div>
        <div v-else-if="false">2</div>
        <div v-else>3</div>

    </div>

    <script type="module">

        import {createApp, reactive} from './vue.esm-browser.js'

        createApp({
            // setup选项、用于设置响应式数据和方法等
            setup(){

                const msg = reactive({
                    show:true
                })

                const edit = () => {
                    msg.show = !msg.show
                }

                return {
                    msg,
                    edit
                }

            }
        }).mount('##app')

    </script>

</body>
</html>
动态属性绑定v-bind简写
<!DOCTYPE html>
<html lang="en">
<head>
    <meta charset="UTF-8">
    <meta name="viewport" content="width=device-width, initial-scale=1.0">
    <title>动态属性绑定v-bind简写</title>
</head>
<body>

    <div id="app">

        <h3>{{ msg }}</h3>

        <a v-bind:href="data.url">百度</a> <br>
        <a :href="data.url">百度</a> <br>

    </div>

    <script type="module">

        import {createApp, reactive} from './vue.esm-browser.js'

        createApp({
            // setup选项、用于设置响应式数据和方法等
            setup(){

                const data = reactive({
                    url:'http://www.baidu.com'
                })

                return {
                    msg:'success',
                    data
                }

            }
        }).mount('##app')

    </script>

</body>
</html>
遍历数组或对象v-for
<!DOCTYPE html>
<html lang="en">
<head>
    <meta charset="UTF-8">
    <meta name="viewport" content="width=device-width, initial-scale=1.0">
    <title>遍历数组或对象v-for</title>
</head>
<body>
    <div id="app">

        <h2>数组</h2>
        <ul>
            <li v-for="(value, index) in data.arr">
                {{ index }} {{ value }}
            </li>
        </ul>

        <h2>对象</h2>
        <ul>
            <li v-for="(value, key) in data.brr">
                {{ key }} {{ value }}
            </li>
        </ul>

        <h2>对象数组</h2>
        <ul>
            <li v-for="(value, index) in data.crr">
                {{ index }} {{ value.name }} {{ value.age }}
            </li>
        </ul>

        <h2>过滤条件</h2>
        <ul>
            <template v-for="(value, index) in data.crr">
                <li v-if="index == 1" :title="value.name" :key="value.id">
                    {{ index }} {{ value.name }} {{ value.age }}
                </li>
            </template>
        </ul>

    </div>
    <script type="module">
        import {createApp, reactive} from './vue.esm-browser.js'
        createApp({
            // setup选项、用于设置响应式数据和方法等
            setup(){
                const data = reactive({
                    arr:['a', 'b'],
                    brr:{name:'张三',age:30},
                    crr:[{id:1, name:'李四',age:40},{id:2, name:'王五',age:50}
                    ]
                })
                return {
                    data
                }
            }
        }).mount('##app')
    </script>
</body>
</html>
双向数据绑定v-model
<!DOCTYPE html>
<html lang="en">
<head>
    <meta charset="UTF-8">
    <meta name="viewport" content="width=device-width, initial-scale=1.0">
    <title>双向数据绑定v-model</title>
</head>
<body>
    <div id="app">
        <div>
            {{data.a}}
            <input type="radio" name="g" value="1" v-model="data.a">
            <input type="radio" name="g" value="2" v-model="data.a">
        </div>
        <div>
            {{data.b}}
            <input type="checkbox" value="1" v-model="data.b">
            <input type="checkbox" value="2" v-model="data.b">
        </div>
        <div>
            {{data.c}}
            <select v-model="data.c">
                <option value="1">1</option>
                <option value="2">2</option>
            </select>
        </div>
    </div>
    <script type="module">
        import {createApp, reactive} from './vue.esm-browser.js'
        createApp({
            // setup选项、用于设置响应式数据和方法等
            setup(){
                const data = reactive({
                    a:1,
                    b:[1],
                    c:1
                })
                return {
                    msg:'success',
                    data
                }
            }
        }).mount('##app')
    </script>
</body>
</html>
v-model修饰符
<!DOCTYPE html>
<html lang="en">
<head>
    <meta charset="UTF-8">
    <meta name="viewport" content="width=device-width, initial-scale=1.0">
    <title>v-model修饰符</title>
</head>
<body>
    <div id="app">
        <div>{{ data }}</div>
        <div>
            <h3>lazy失去焦点或按下回车之后渲染</h3>
            <input type="text" v-model.lazy="data.name"> <br>
            <h3>trim去除收尾空格、失去焦点或按下回车之后渲染、中间空格不能去除</h3>
            <input type="text" v-model.trim="data.name"> <br>
            <h3>number值转换为数字类型、注意是根据首字符类型来判断的、结尾汉字没有变化但如果开头汉字则改变</h3>
            <input type="text" v-model.number="data.age"> <br>
        </div>
    </div>
    <script type="module">
        import {createApp, reactive} from './vue.esm-browser.js'
        createApp({
            // setup选项、用于设置响应式数据和方法等
            setup(){
                const data = reactive({
                    name:'jack',
                    age:18
                })
                return {
                    msg:'success',
                    data
                }
            }
        }).mount('##app')
    </script>
</body>
</html>
渲染数据v-text和v-html
<!DOCTYPE html>
<html lang="en">
<head>
    <meta charset="UTF-8">
    <meta name="viewport" content="width=device-width, initial-scale=1.0">
    <title>渲染数据v-text和v-html</title>
</head>
<body>
    <div id="app">
        <div v-text="data.a"></div>
        <div v-html="data.b"></div>
    </div>
    <script type="module">
        import {createApp, reactive} from './vue.esm-browser.js'
        createApp({
            setup(){
                const data = reactive({
                    a:'纯文本',
                    b:'<input>'
                })
                return {
                    data
                }
            }
        }).mount('##app')
    </script>
</body>
</html>
计算属性computed
<!DOCTYPE html>
<html lang="en">
<head>
    <meta charset="UTF-8">
    <meta name="viewport" content="width=device-width, initial-scale=1.0">
    <title>计算属性computed</title>
</head>
<body>
    <div id="app">

        <h3>方法:无缓存</h3>
        <div>{{ add() }}</div>
        <div>{{ add() }}</div>

        <h3>计算属性:有缓存(计算属性根据其依赖的响应式数据变化而重新计算、sub是属性不是方法)</h3>
        <div>{{ sub }}</div>
        <div>{{ sub }}</div>

        <h3>不加number获取的是字符串</h3>
        <div>
            <input type="text" v-model.number="data.a">
            <input type="text" v-model.number="data.b">
        </div>

    </div>
    <script type="module">
        import {createApp, reactive, computed} from './vue.esm-browser.js'
        createApp({
            setup(){
                const data = reactive({
                    a:1,
                    b:2
                })
                let add = () => {
                    console.log('add')
                    return data.a + data.b
                }
                const sub = computed(() => {
                    console.log('sub')
                    return data.a - data.b
                })
                return {
                    data,
                    add,
                    sub
                }
            }
        }).mount('##app')
    </script>
</body>
</html>
侦听器watch
<!DOCTYPE html>
<html lang="en">
<head>
    <meta charset="UTF-8">
    <meta name="viewport" content="width=device-width, initial-scale=1.0">
    <title>侦听器watch</title>
</head>
<body>
    <div id="app">

        <select v-model="hobby">
            <option value="">请选择</option>
            <option value="1">游泳</option>
            <option value="2">篮球</option>
        </select>

        <select v-model="data.year">
            <option value="">请选择</option>
            <option value="2023">2023</option>
            <option value="2024">2024</option>
        </select>

        <select v-model="data.month">
            <option value="">请选择</option>
            <option value="4">4</option>
            <option value="5">5</option>
        </select>

    </div>
    <script type="module">
        import {createApp, reactive, ref, watch} from './vue.esm-browser.js'
        createApp({
            setup(){

                const hobby = ref('')
                const data = reactive({
                    year:2024,
                    month:4
                })

                watch(hobby, (newValue, oldValue) => {
                    console.log(newValue, oldValue)
                })

                // 侦听整个data
                // 注意:newValue和oldValue打印结果一样的原因
                // JS对象和数组是通过引用传递的、而不是通过值传递
                // 当修改对象或数组时、实际上修改的是对象或数组的引用、而不是创建一个新的对象或数组
                // 所以、如果修改了对象或数组的值、那么打印出来的结果则是修改后的值
                watch(data, (newValue, oldValue) => {
                    // console.log(newValue, oldValue)
                    console.log('年或月发生变化')
                })

                // 监听data中的某个属性
                watch(() => data.year, (newValue, oldValue) => {
                    console.log('只有年发生变化')
                })

                // 监听data中的某个属性
                watch(() => data.month, (newValue, oldValue) => {
                    console.log('只有月发生变化')
                })

                return {
                    data,
                    hobby
                }
            }
        }).mount('##app')
    </script>
</body>
</html>
自动侦听器watchEffect
<!DOCTYPE html>
<html lang="en">
<head>
    <meta charset="UTF-8">
    <meta name="viewport" content="width=device-width, initial-scale=1.0">
    <title>自动侦听器watchEffect</title>
</head>
<body>
    <div id="app">

        <select v-model="hobby">
            <option value="">请选择</option>
            <option value="1">游泳</option>
            <option value="2">篮球</option>
        </select>

        <select v-model="data.year">
            <option value="">请选择</option>
            <option value="2023">2023</option>
            <option value="2024">2024</option>
        </select>

        <select v-model="data.month">
            <option value="">请选择</option>
            <option value="3">3</option>
            <option value="4">4</option>
        </select>

    </div>
    <script type="module">
        import {createApp, reactive, ref, watchEffect} from './vue.esm-browser.js'
        createApp({
            setup(){
                const hobby = ref('')
                const data = reactive({
                    year:2024,
                    month:4
                })

                // 自动侦听
                watchEffect(()=>{
                    console.log('侦听开始')

                    if (hobby.value == 2) {
                        console.log('篮球')
                    }

                    if (data.year == 2024) {
                        console.log('2024年')
                    }

                    if (data.month == 4) {
                        console.log('4月')
                    }

                    console.log('侦听结束')
                })

                return {
                    data,
                    hobby
                }
            }
        }).mount('##app')
    </script>
</body>
</html>
(4)Vue3核心语法二
Vue2语法
A.vue
<template>
    <h1>子组件A</h1>
</template>
<script>
</script>

App.vue
<script>
import A from './demo2/A.vue'
export default {
    name:'App',
    components:{
        A
    },
    data(){
        return {
            name:'vue2'
        }
    },
    methods:{

    }
}
</script>
<template>
    <h1>{{ name }}</h1>
    <A></A>
</template>
响应式reactive数组
B.vue
<template>
    <h1>子组件B</h1>
</template>
<script>
</script>

App.vue
<script setup>
import B from './demo/B.vue'
import {reactive} from 'vue'
const arr = reactive([1,2,3])
function m() {
    arr.push(4)
}
</script>
<template>
    <div>{{ arr }}</div>
    <div>
        <button @click="m">按钮</button>
    </div>
    <B></B>
</template>
响应式reactive对象
<script setup>
import {reactive} from 'vue'
const myData = reactive({
    name:'jack',
    age:18,
    friends:['sam','stephen']
})
function m() {
    myData.name = '张三'
    myData.age = 33
    myData.friends.push('李四')
}
</script>
<template>
    <div>{{ myData }}</div>
    <div>
        <button @click="m">按钮</button>
    </div>
</template>
潜响应式shallowReactive
注意:演示必须只单独测试深层的属性、如果同时访问根属性深属性也会改变

<script setup>
import { shallowReactive, reactive } from 'vue'
const state = shallowReactive({
    count: 0,
    user: {
        name: 'jack',
        age: 30
    }
})
function m() {
    // count 是响应式的,Vue 可以追踪到它的更改
    state.count++;
    // user 是一个普通对象,不是响应式的
    state.user.name += '张三'; // 这个更改不会触发视图更新
}
</script>
<template>
    <div>{{ state.user.name }}</div>
    <div>
        <button @click="m">按钮</button>
    </div>
</template>
响应式ref基础类型
原理:
reactive基于ES6的proxy
proxy只支持对象不支持基础类型
所以ref是封装了一个proxy的value

<script setup>
import { ref } from 'vue'
const myData = ref(0)
function m() {
    myData.value++
}
</script>
<template>
    <div>{{ myData }}</div>
    <div>
        <button @click="m">按钮</button>
    </div>
</template>
非响应式readonly只读
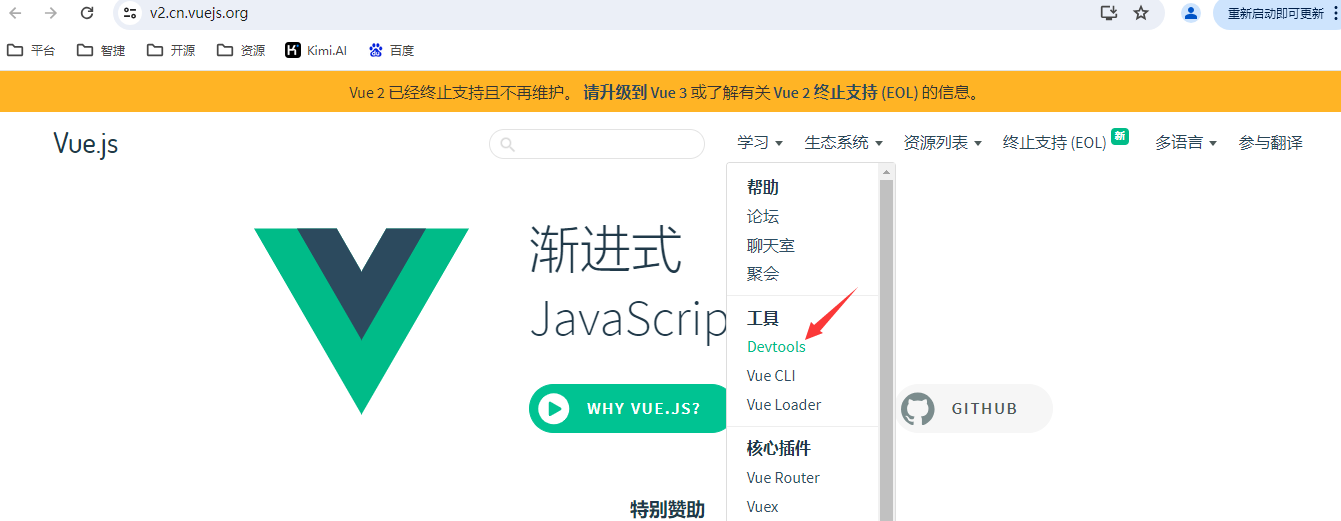
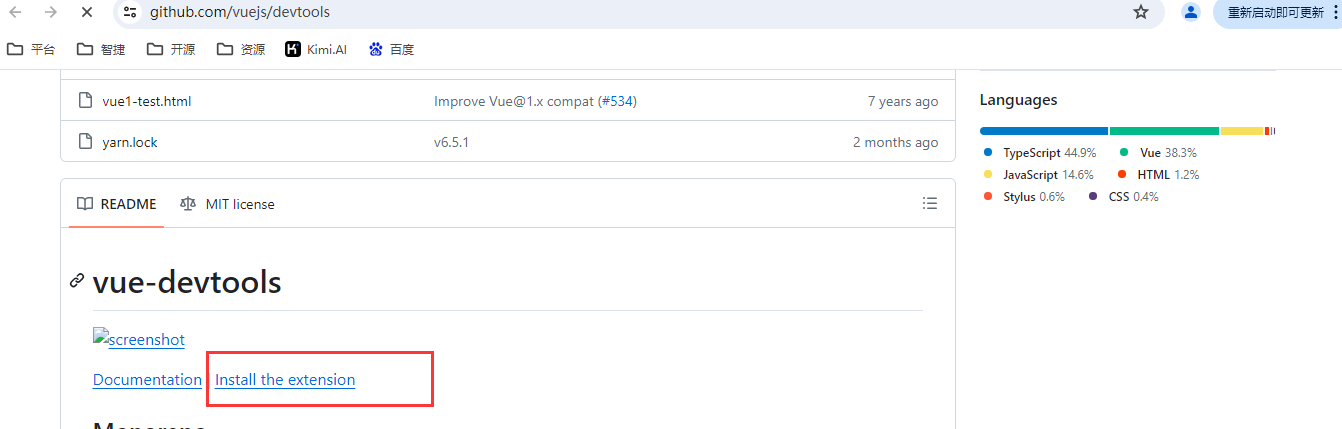
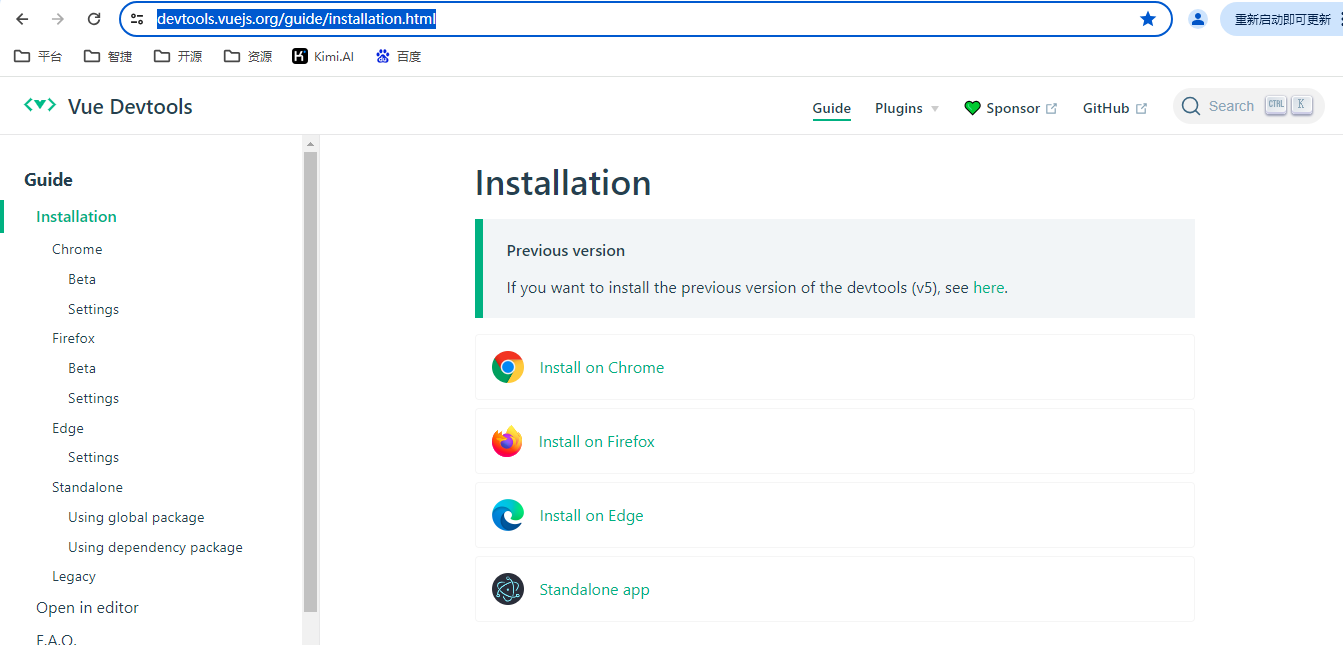
浏览器安装vue-devtools插件

<script setup>
import { readonly, shallowReadonly } from 'vue'
const myData = readonly({
    name:'jack',
    age:18
})
function m() {
    myData.age++
    console.log(myData.age)
}
</script>
<template>
    <div>{{ myData }}</div>
    <div>
        <button @click="m">按钮</button>
    </div>
</template>
潜响应式shallowReadonly
注意:演示必须只单独测试深层的属性、如果同时访问根属性深属性也会改变

<script setup>
import { readonly, shallowReadonly } from 'vue'
const myData = shallowReadonly({
    name:'jack',
    age:18,
    person:{age:18}
})
function m() {
    myData.age++
    myData.person.age++
}
</script>
<template>
    <div>{{ myData }}</div>
    <div>
        <button @click="m">按钮</button>
    </div>
</template>
Computed计算属性
<script setup>
import { ref, computed } from 'vue'
const a = ref('这是一段测试内容')
const b = computed(()=>{
    console.log('计算属性执行')
    return a.value.length
})
function m() {
    a.value += '!'
}
</script>
<template>
    <div>{{ a }}</div>
    <div>{{ b }}</div>
    <div>
        <button @click="m">按钮</button>
    </div>
</template>
Watch侦听器ref
<script setup>
import { ref, watch } from 'vue'
const a = ref(0)
watch(a,(newValue, oldValue)=>{
    console.log(newValue, oldValue)
})
function m() {
    a.value++
}
</script>
<template>
    <div>{{ a }}</div>
    <div>
        <button @click="m">按钮</button>
    </div>
</template>
Watch侦听器reactive整个
<script setup>
import { reactive, watch } from 'vue'
const myData = reactive({name:'jack',age:18})
watch(myData,(newValue, oldValue)=>{
    console.log(newValue, oldValue)
})
function m() {
    myData.name = '张三'
    myData.age = 88
}
</script>
<template>
    <div>{{ myData }}</div>
    <div>
        <button @click="m">按钮</button>
    </div>
</template>
Watch侦听器reactive某个
<script setup>
import { reactive, watch } from 'vue'
const myData = reactive({name:'jack',age:18})
watch(()=>myData.age,(newValue, oldValue)=>{
    console.log(newValue, oldValue)
})
function m() {
    // myData.name = '张三'
    myData.age = 88
}
</script>
<template>
    <div>{{ myData }}</div>
    <div>
        <button @click="m">按钮</button>
    </div>
</template>
WatchEffect侦听器
<script setup>
import { ref, reactive, watchEffect } from 'vue'
const count = ref(0)
const myData = reactive({name:'jack',age:18})
watchEffect(()=>{
    console.log(count.value)
    console.log(myData.age)
})
function m() {
    count.value++
    myData.age++
}
</script>
<template>
    <div>{{ count }}</div>
    <div>{{ myData }}</div>
    <div>
        <button @click="m">按钮</button>
    </div>
</template>
(5)Vue3核心语法三
入门案例
A.vue
<template>
    <div>
        Vue3入门案例
    </div>
    <div>
        {{ myData.name }}
    </div>
    <div>
        {{ myData.age }}
    </div>
</template>

<script setup>

import { reactive } from 'vue'

const myData = reactive({
 name:'jack',
 age:18
})

</script>

<style lang="scss" scoped>

</style>

App.vue
<script setup lang="ts">
import A from './demo/A.vue'
</script>

<template>
  <A />
</template>
导入组件
B.vue
<template>
    <div>
        导入组件
    </div>
</template>

<script setup>

</script>

<style lang="scss" scoped>

</style>

App.vue
<script setup lang="ts">
import B from './demo/B.vue'
</script>

<template>
  <B />
</template>
父传子(defineProps)
App.vue
<script setup lang="ts">
import C from './demo/C.vue'
const myData = {
 name: 'jack',
 age: 18
}
const myData2 = {
 name: 'stephen',
 age: 28
}
</script>

<template>
  <C x="sam" y="8"/>
  <C v-bind="myData"/>
  <C :="myData2"/>
</template>


C.vue方式一:数组形式
<template>
    <div>
        子组件
    </div>
</template>

<script setup>
// 并没有import导入defineProps是因为defineProps是vue3编译时的宏函数
const props = defineProps(['x', 'y'])
console.log(props.x)
console.log(props.y)
</script>

<style lang="scss" scoped>

</style>


C.vue方式二:对象形式
<template>
    <div>
        子组件
    </div>
</template>

<script setup>
const props = defineProps({
 name: String,
 age: Number
})
console.log(props)
console.log(props.name)
console.log(props.age)
</script>

<style lang="scss" scoped>

</style>


C.vue方式二扩展
<template>
    <div>
        子组件
    </div>
</template>

<script setup>
const props = defineProps({
 name: String,
 age: {
    type: Number,
    default: 18,
    requered: true
 }
})
console.log(props)
console.log(props.name)
console.log(props.age)
</script>

<style lang="scss" scoped>

</style>
父传子(注意响应式数据)
App.vue
<script setup lang="ts">
import D from './demo/D.vue'
import { reactive } from 'vue'

// 错误原因:myData不是响应式数据
// const myData = {
//   name: 'jack',
//   age: 18
// }

// 正确写法:响应式函数
const myData = reactive({
  name: 'jack',
  age: 18
})

const m = () => {
  myData.age++
  console.log(myData.age)
}

</script>

<template>
  <D :="myData"/>
  <button @click="m">按钮</button>
</template>


D.Vue
<template>
    <div>
        {{ props.age }}
    </div>
</template>

<script setup>
// 注意:类型必须是String和Number
const props = defineProps({
    name: String,
    age: {
        type: Number,
        required: true,
        default: 8
    }
})
</script>

<style lang="scss" scoped>

</style>
子传父(defineEmits)
E.vue
<template>
    <button @click="m">按钮</button>
  </template>

<script setup lang="ts">

// 宏函数
const emits = defineEmits(['getE1','getE2'])

emits('getE1', {name:'jack', age:18})

const m = ()=>{
  emits('getE2', 100)
}

</script>

<style lang="scss" scoped>

</style>


App.vue
<script setup lang="ts">
import E from './demo/E.vue'
import {reactive, ref} from 'vue'

const m1 = (data)=>{
  console.log(data)
}
const m2 = (data)=>{
  console.log(data)
}

</script>

<template>

  <div>
    <E @getE1="m1" @getE2="m2" />
  </div>

</template>
跨组件通信(provide 、inject )
App.vue
<script setup lang="ts">
import F from './demo/F.vue'

// provide可以把父组件中数据传递给任何子组件
import { reactive, provide } from 'vue'

// 非响应式
const myData = {name: 'jack'}
// 响应式
const myData2 = reactive({name: 'stephen'})

provide('provideKey', myData)
provide('provideKey2', myData2)

</script>

<template>
  <F/>
</template>


F.vue
<template>
    <div>

    </div>
</template>

<script setup>
import { inject } from 'vue'

const myData = inject('provideKey')
console.log(myData)

const myData2 = inject('provideKey2')
console.log(myData2)

</script>

<style lang="scss" scoped>

</style>
传递函数(provide 、inject )
App.vue
<script setup lang="ts">
import G from './demo/G.vue'
import {reactive, ref, provide} from 'vue'

const myData = ref(0)

const MyMethod = ()=>{
  myData.value++
}

provide('provideKey', MyMethod)

</script>

<template>
  <G/>
  {{ myData }}
</template>


G.vue
<template>
    <button @click="m">按钮</button>
</template>

<script setup>
import { inject } from 'vue'

const m = inject('provideKey')
console.log(m)

</script>

<style lang="scss" scoped>

</style>
匿名插槽(父向子slot)
App.vue
<script setup lang="ts">
import H from './demo/H.vue'

// 插槽:可以在父组件内自定义模板片段、在子组件中可以将定义的模板片段插入到子组件的特定位置

</script>

<template>
  <H>
    <a href="http://www.baidu.com">百度</a>
  </H>
</template>


H.vue
<template>
   <slot/>
</template>

<script setup>

</script>

<style lang="scss" scoped>

</style>
具名插槽(父向子v-slot)
App.vue
<script setup lang="ts">
import K from './demo/K.vue'
</script>

<template>
  <K>
    <template v-slot:url>
      <a href="http://www.baidu.com">百度1</a>
    </template>

    <template v-slot:url2>
      <a href="http://www.baidu.com">百度2</a>
    </template>
  </K>
</template>


K.vue
<template>
    <slot name="url"></slot>
    <slot name="url2"></slot>

</template>

<script setup>

</script>

<style lang="scss" scoped>

</style>
作用域插槽(子向父slot )
M.vue
<template>

<!-- 作用域插槽:子组件向父组件传递数据、并在父组件定义的模板中渲染 -->
<slot name="url" title="jack" count="1000" />

<slot name="a" b="stephen" c="2000" />

</template>

<script setup>

</script>

<style lang="scss" scoped>

</style>


App.vue
<script setup lang="ts">
import M from './demo/M.vue'
</script>

<template>
  <M>

    <template ##url="data">
      {{ data.title }}
      {{ data.count }}
    </template>

    <br>

        <!-- 解构方式 -->
    <template ##a="{b, c}">
      {{ b }}
      {{ c }}
    </template>

  </M>
</template>
生命周期函数(挂载、更新、卸载、错误)
N.vue
<template>
    {{ a }}
    <button @click="m">按钮</button>
</template>

<script setup>
import { onMounted, onUpdated, ref } from 'vue'

const a = ref(0)
console.log(a)

onMounted(()=>{
 console.log('onMounted')
})

// 注意:必须是响应式数据更新
onUpdated(()=>{
 console.log('onUpdated')
})

const m = () => {
 a.value++
}
</script>

<style lang="scss" scoped>

</style>


App.vue
<script setup lang="ts">
import N from './demo/N.vue'
</script>
<template>
  <N>
  </N>
</template>
toRef和toRefs
<template>

</template>

<script setup>

// toRefs 和 toRef 是 Vue 3 的 Composition API 中用于将 reactive 对象或 ref 对象中的属性转换为 ref 对象的函数。
import { reactive, toRef, toRefs } from 'vue'

// (1) toRef 用于将 reactive 对象中的单个属性转换为 ref 对象。它接受两个参数:
// object:要转换的 reactive 对象
// key:要转换为 ref 的属性名

const state = reactive({ count: 0 })

const countRef = toRef(state, 'count')

console.log(countRef.value)

// (2) toRefs 用于将 reactive 对象中的多个属性转换为一个包含多个 ref 对象的数组。
// 它接受一个 reactive 对象作为参数,并返回一个包含 ref 对象的数组。

const state2 = reactive({ count: 100, name: 'John' })

const { count, name } = toRefs(state2)

console.log(count.value)
console.log(name.value)

</script>

<style lang="scss" scoped>

</style>
(5)Pinia
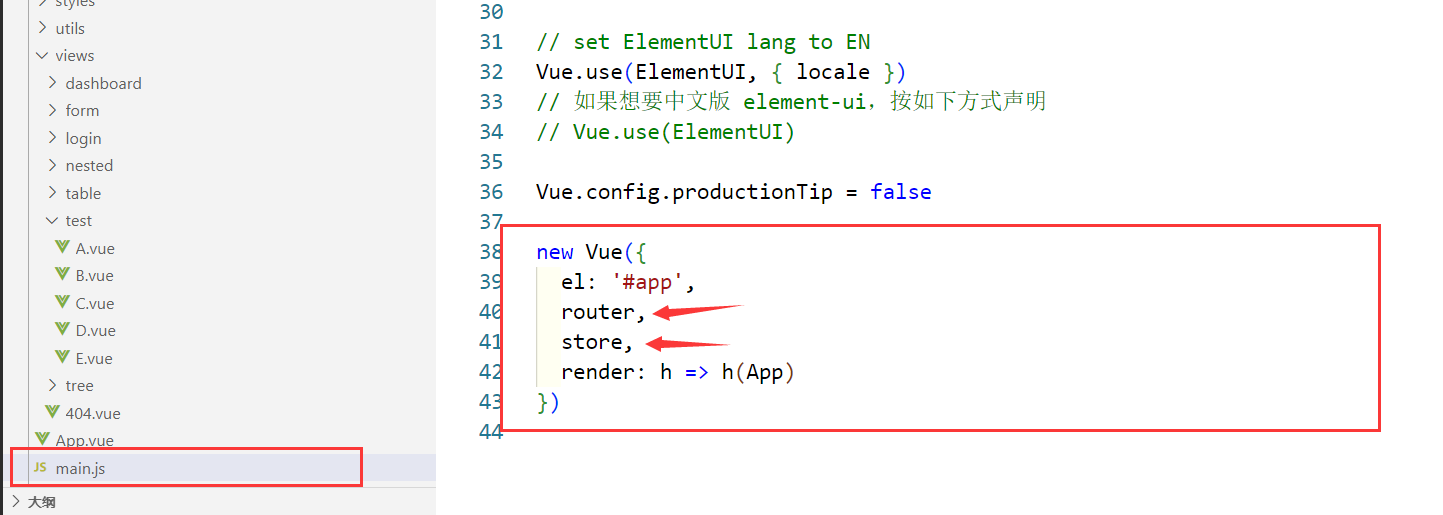
安装引入持久化存储插件
npm install pinia
Main.js
import { createPinia } from 'pinia'
const pinia = createPinia()
createApp(App).use(pinia).mount('##app')
npm i pinia-plugin-persistedstate
import { createPinia } from 'pinia'
import piniaPluginPersistedstate from 'pinia-plugin-persistedstate'
const pinia = createPinia()
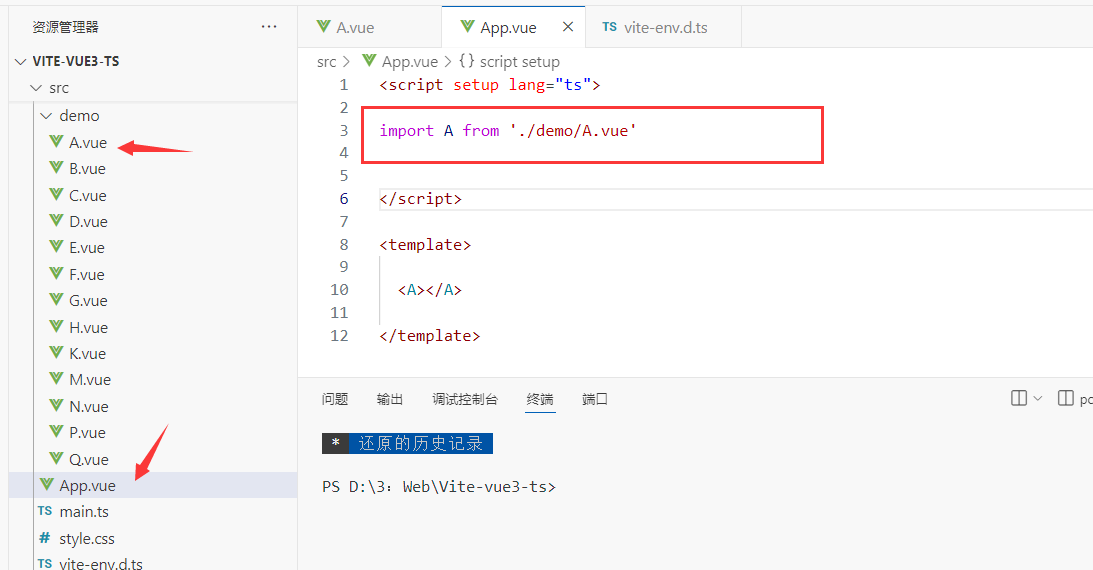
pinia.use(piniaPluginPersistedstate)路径问题解决方案
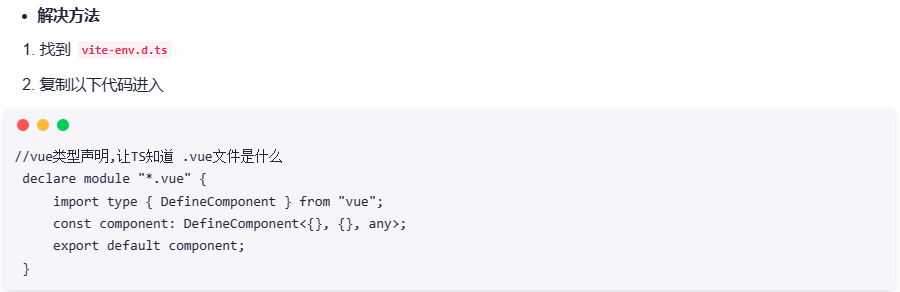
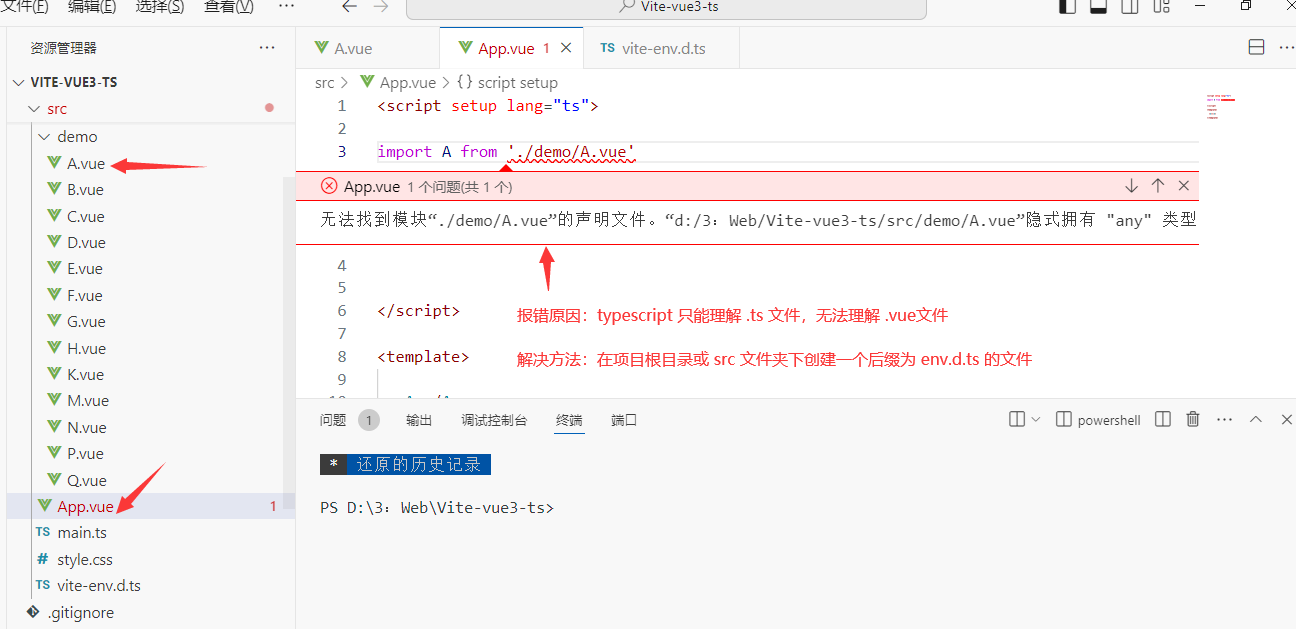
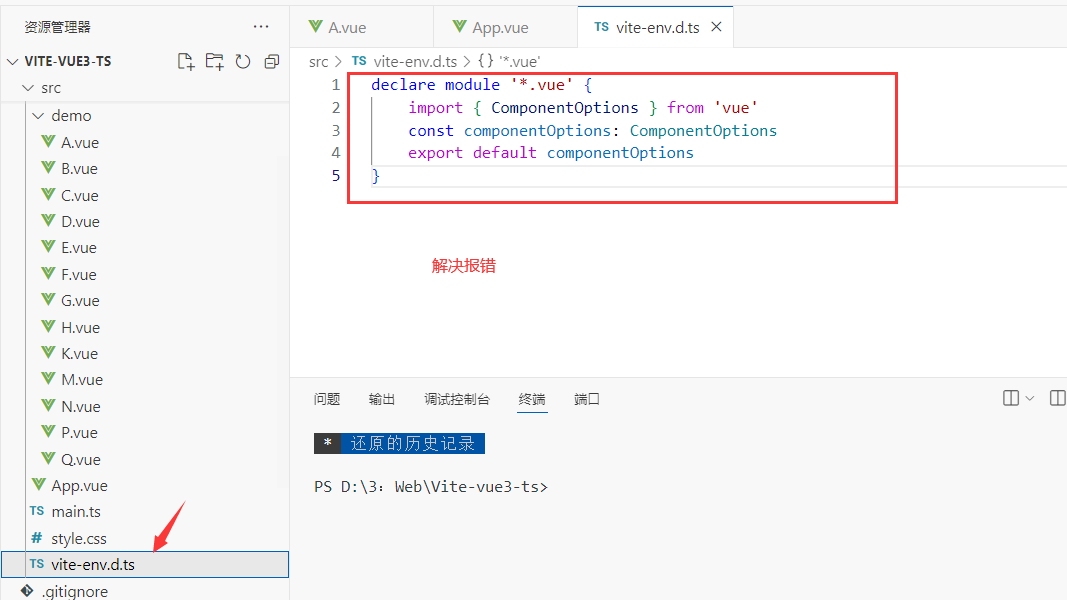
//vue类型声明,让TS知道 .vue文件是什么
declare module "*.vue" {
import type { DefineComponent } from "vue";
const component: DefineComponent<{}, {}, any>;
export default component;
}
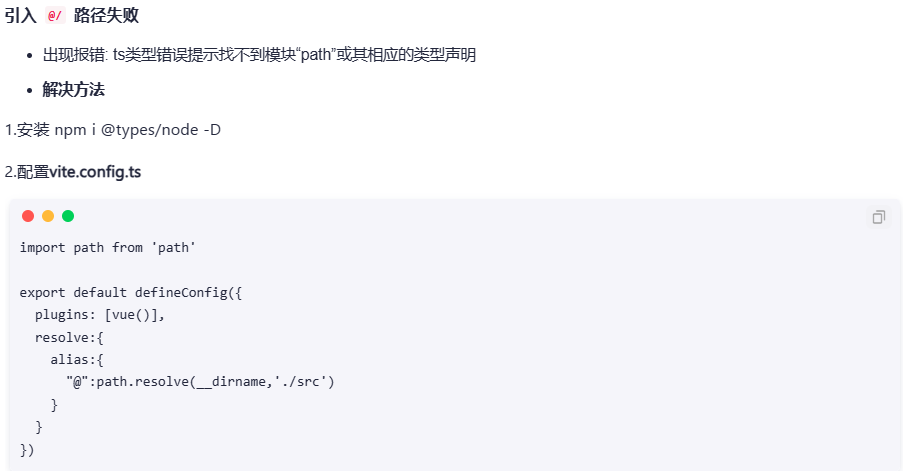
npm i @types/node -D
import path from 'path'
export default defineConfig({
plugins: [vue()],
resolve:{
alias:{
"@":path.resolve(__dirname,'./src')
}
}
})
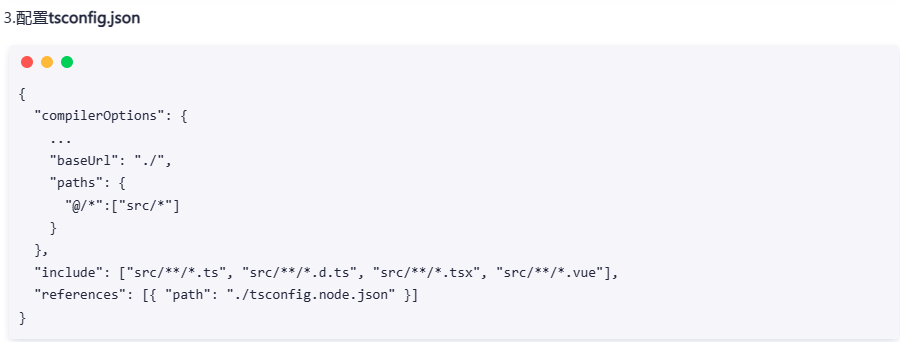
{
"compilerOptions": {
...
"baseUrl": "./",
"paths": {
"@/*":["src/*"]
}
},
"include": ["src/**/*.ts", "src/**/*.d.ts", "src/**/*.tsx", "src/**/*.vue"],
"references": [{ "path": "./tsconfig.node.json" }]
}在src目录下新建store/index.js
import { defineStore } from "pinia";
// 第一个参数 storeId 是小仓库名称 必须独一无二
// 第二个参数是小仓库的配置对象,
// defineStore方法执行返回一个函数,函数执行可以让组件获取仓库实例
export const useStore = defineStore("storeId", {
  state: () => {
    return {
      count: 0,
      name: "张三",
    };
  },
  getters: {},
  actions: {},
});
在组件中使用Pinia的state数据
<template>
    <div>
        <h1>{{ count }}</h1>
        <h1>{{ name }}</h1>
    </div>
</template>

<script setup>
import { useStore } from '@/store/index'
// import { useStore } from '../store/index'
const store = useStore();
const { count, name } = store;
</script>
组件修改Pinia中的数据
本身pinia可以直接修改state数据,无需像vuex一样通过mutations才可以修改,但是上面写的const { name } = store;这种解构是不可以的,所以要换解构的方式。

R.vue
<template>
    <div>
      <h1>组件</h1>
      {{ count }}
    </div>
  </template>
  <script setup>
  import { storeToRefs } from "pinia";
  import { useStore } from "@/store/index";
  const store = useStore();
  // 第一种、直接修改
//   store.count++;
  // 第二种、调用$patch方法修改
//   countStore.$patch({
//     count: store.count + 2,
//   });
  // 第三种
  // pinia提供了 一个 storeToRefs 方法 类似于 vue3中 toRefs
  const { count } = storeToRefs(store);
  count.value = 1000;
  </script>
getters的使用
getters和vuex里的getters几乎类似,基于 已有的state 进行计算得到新值,会基于依赖进行缓存,多次使用依赖不变 不会重新计算

Index.js
import { defineStore } from "pinia";
// 第一个参数 storeId 是仓库的key 必须独一无二
export const useStore = defineStore("storeId", {
  state: () => {
    return {
      num: 10,
      name: "张三",
    };
  },
  getters: {
    // 1 箭头函数写法 参数是state
    doubleNum: (state) => {
      return state.num * 2;
    },
    // 2 对象方法写法
    tribleNum(state) {
      return state.num * 3;
    },
  },
  actions: {},
});

R.vue
<template>
    <div>
      {{ doubleNum }}
      {{ tribleNum }}
      {{ tribleNum }}
      <h1>组件</h1>
      {{ num }}
    </div>
  </template>
  <script setup>
  import { storeToRefs } from "pinia";
  import { useStore } from "../store/index";
  const store = useStore();
  //直接使用
  console.log(store.doubleNum);
  //解构
  const { num, doubleNum, tribleNum } = storeToRefs(store);
  </script>
actions的使用
actions就比较简单了,写入方法,比如我们可以让state中的某一个值+=,而且传入参数

Index.js
import { defineStore } from "pinia";
// 第一个参数 storeId 是仓库的key 必须独一无二
export const useStore = defineStore("storeId", {
  state: () => {
    return {
      num: 10,
      name: "张三",
    };
  },
  getters: {
    // 1 箭头函数写法 参数是state
    doubleNum: (state) => {
      return state.num * 2;
    },
    // 2 对象方法写法
    tribleNum(state) {
      return state.num * 3;
    },
  },
  actions: {
    addNum(n) {
      // 直接通过this 千万不要写箭头函数
      // 没有commit没有mutations去修改行下文
      this.num += n;
    },
  },
});


R.vue
<script setup>
import { storeToRefs } from "pinia";
import { useStore } from "../store/index";
const store = useStore();
//直接使用
store.addNum(100);
</script>